
Looking for a handmade decoration that feels festive without being complicated?
An easy Halloween paper wreath is the perfect seasonal craft.
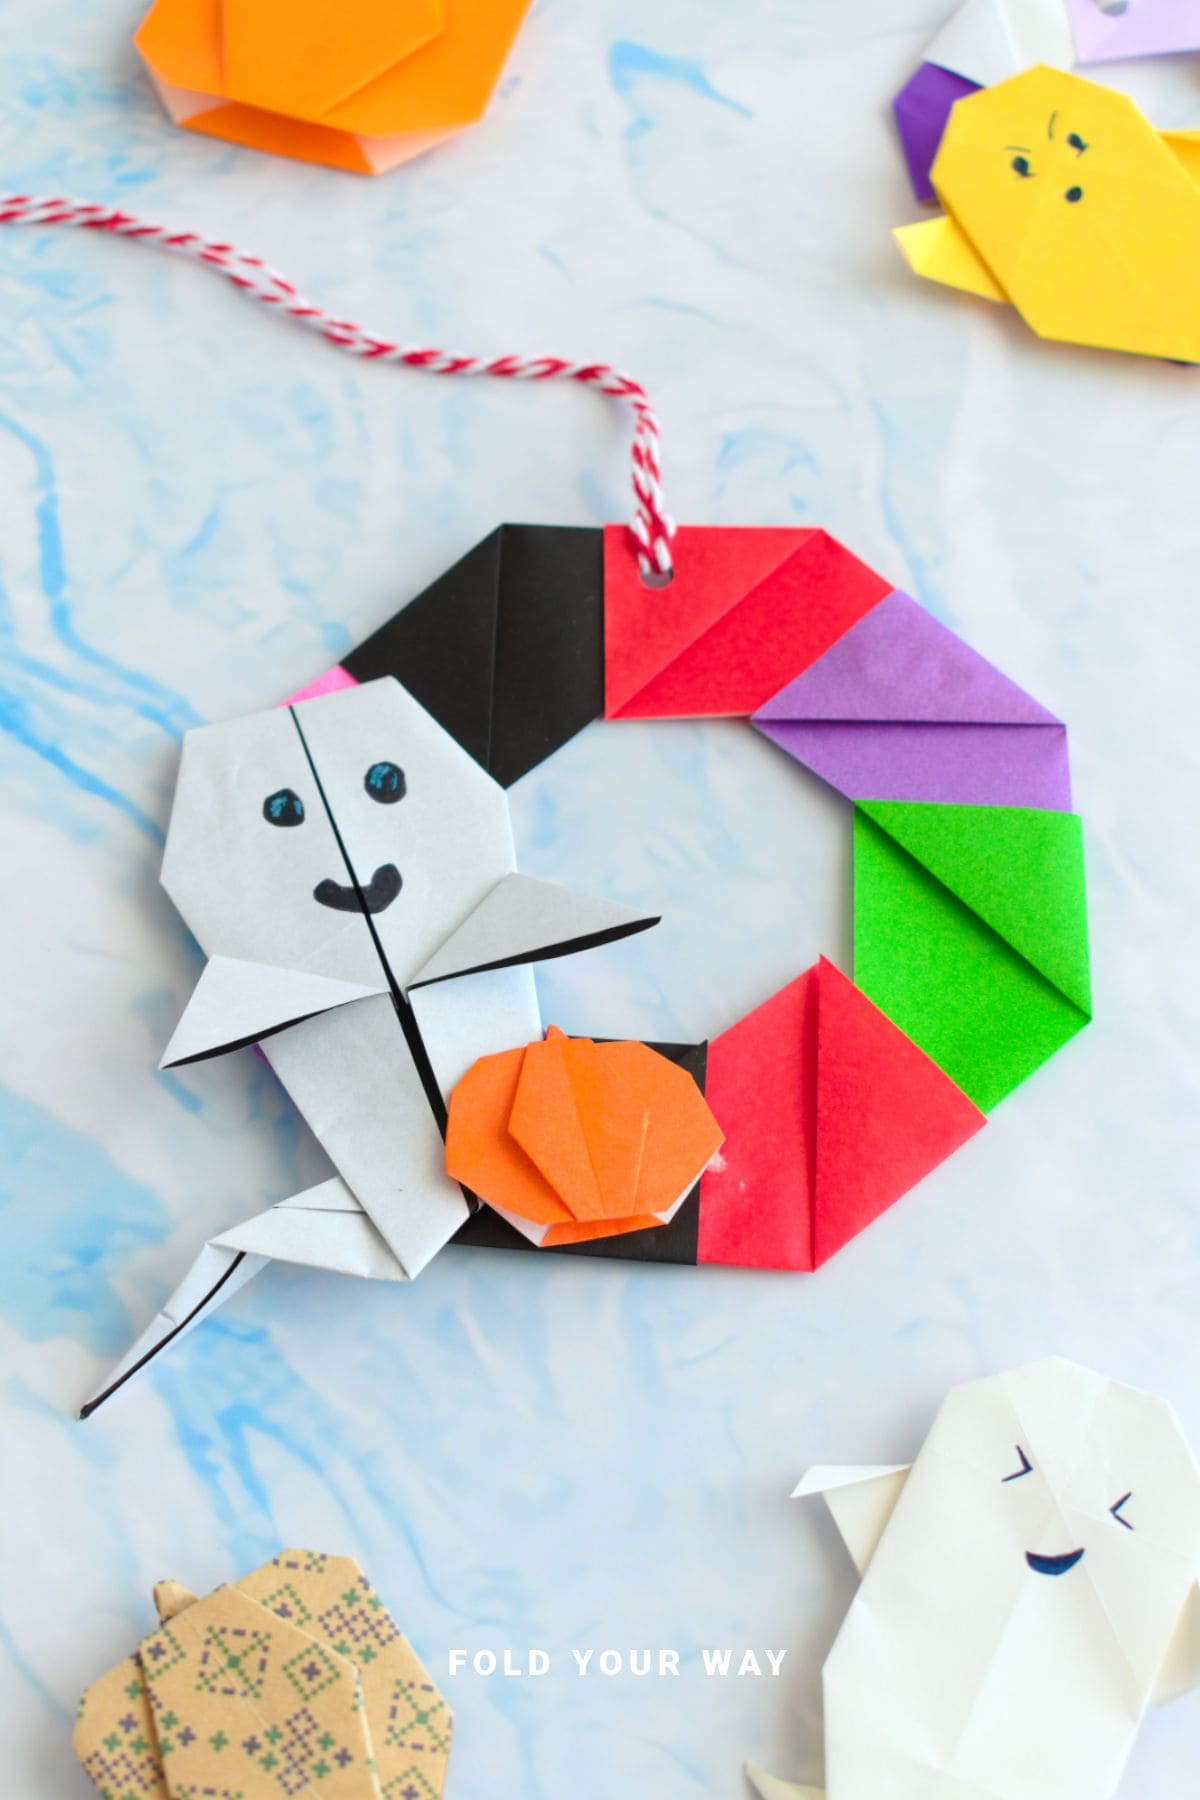
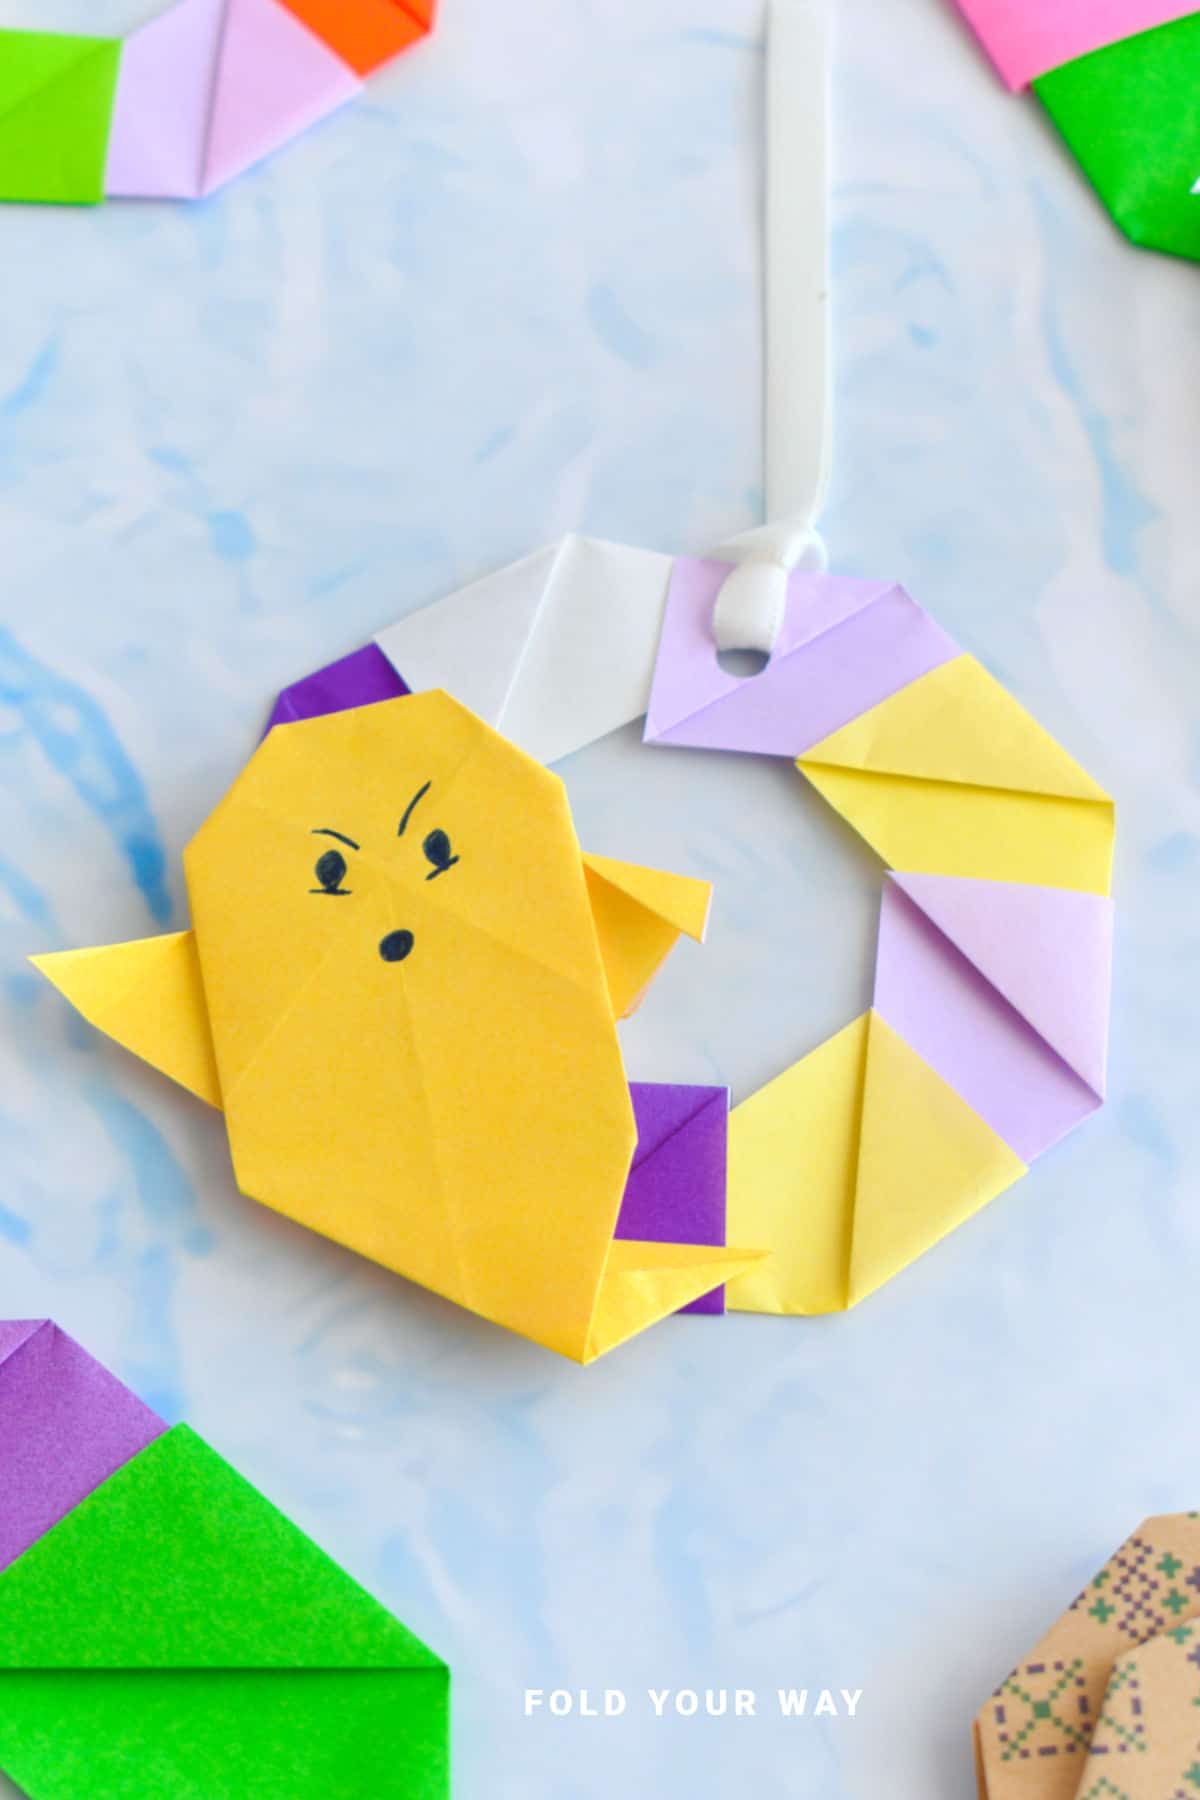
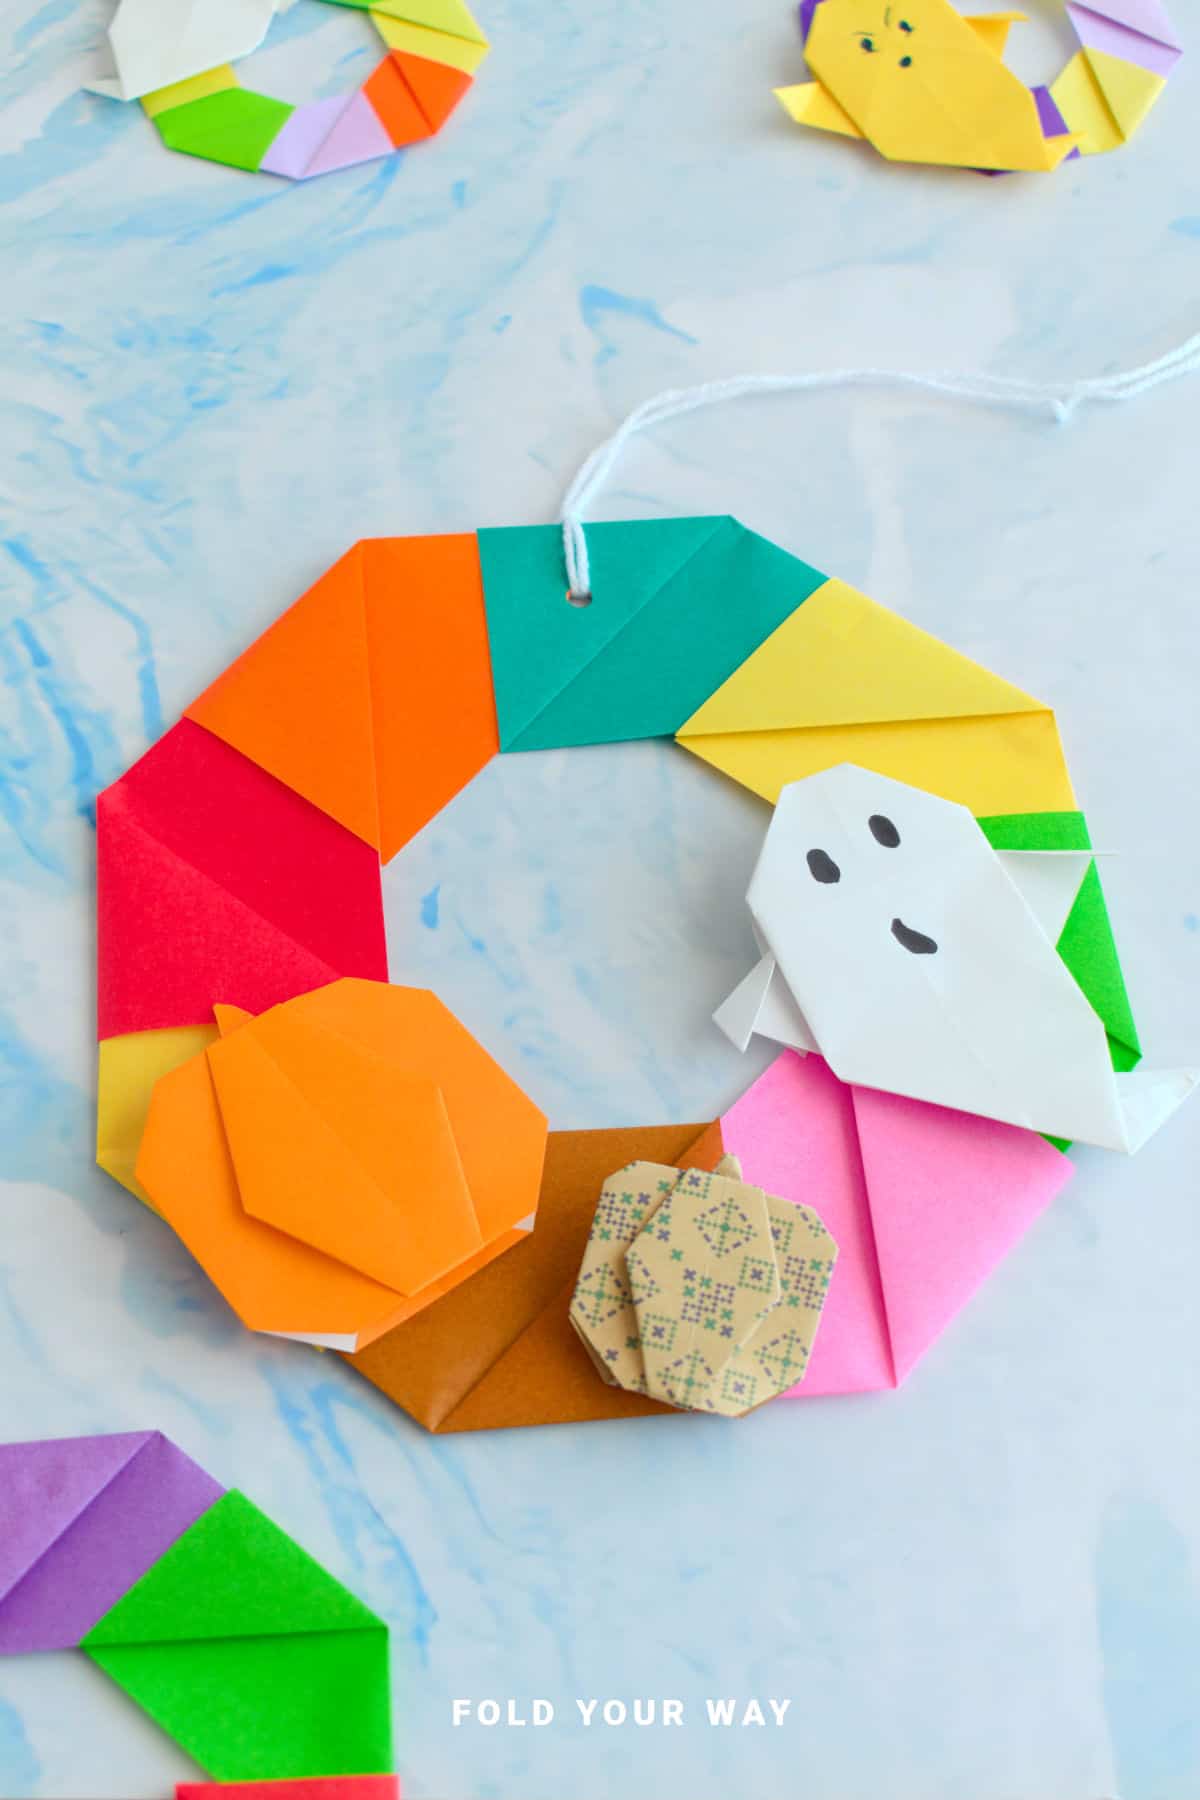
Using just paper, you’ll create a cute wreath base with just eight sheets, then decorate it with origami ghosts and pumpkins for a spooky, welcoming touch.
Jump to:
- Why You'll Love This Pattern
- Skill Level
- Materials Needed
- Instructions
- Tips For Success
- Common Mistakes & How To Avoid Them
- Color, Paper Ideas, and Variations
- FAQ
- Other Paper Crafts You Might Like To Try:
- Helpful Tips and Common Mistakes For Paper Crafts
- Stay Connected
- Other Patterns You Might Like To Try:
- Comments
Halloween decorating doesn’t always have to mean buying plastic pumpkins and pre-made garlands.
Sometimes the most memorable pieces are the ones you create yourself, and an easy Halloween paper wreath is a wonderful way to bring that personal touch to your home.
This project uses modular origami but it's really easy! You’ll fold eight paper units that slot together neatly to form the wreath’s circular base.
It’s simple, satisfying, and a lovely way to explore origami without needing advanced skills.
Once your base is finished, you can decorate with small origami pumpkins and ghosts made from orange and white paper.
These details give your wreath a playful, seasonal feel that’s perfect for hanging on a front door, in a hallway, or even as a table centerpiece.
The best part? This easy Halloween paper wreath doesn’t require fancy supplies — just paper, a hole punch, string, and a little time.
Whether you’re crafting for a party, decorating for trick-or-treaters, or enjoying a quiet seasonal project, this wreath makes Halloween feel special in a way store-bought décor never quite does.
Why You'll Love This Pattern
- Only eight sheets of paper are needed for the wreath base — simple and affordable
- Modular origami makes the wreath sturdy but easy to assemble
- Adding origami ghosts and pumpkins brings instant Halloween character
- No advanced origami skills are required, so it’s beginner-friendly
- This easy Halloween paper wreath is lightweight, versatile, and reusable year after year
- Make these wreaths in various sizes and turn it into a cute Halloween garland!
Skill Level
★☆☆☆☆ (Easy)
Materials Needed
- 8 square sheets of paper (black, orange, or purple work well)
- Hole punch
- String or thin ribbon for hanging
- Optional: craft glue (for extra security)
- Extra white and orange paper for folding ghosts and pumpkins
| PAPER SIZE (8 pieces needed) | FINAL WREATH SIZE | |
| SMALL PAPER WREATH | 2 inches x 2 inches (5 cm x 5 cm) | 3.5 inches x 3.5 inches (9 cm x 9 cm) |
| LARGE PAPER WREATH | 4.5 inches x 4.5 inches (11.5 cm x 11.5 cm) | 8 inches x 8 inches (20 cm x 20 cm) |
Instructions
MAKING THE PAPER WREATH BASE
Let’s start by making the wreath. We recommend using Halloween colors (e.g. reds, greens, purples, black).
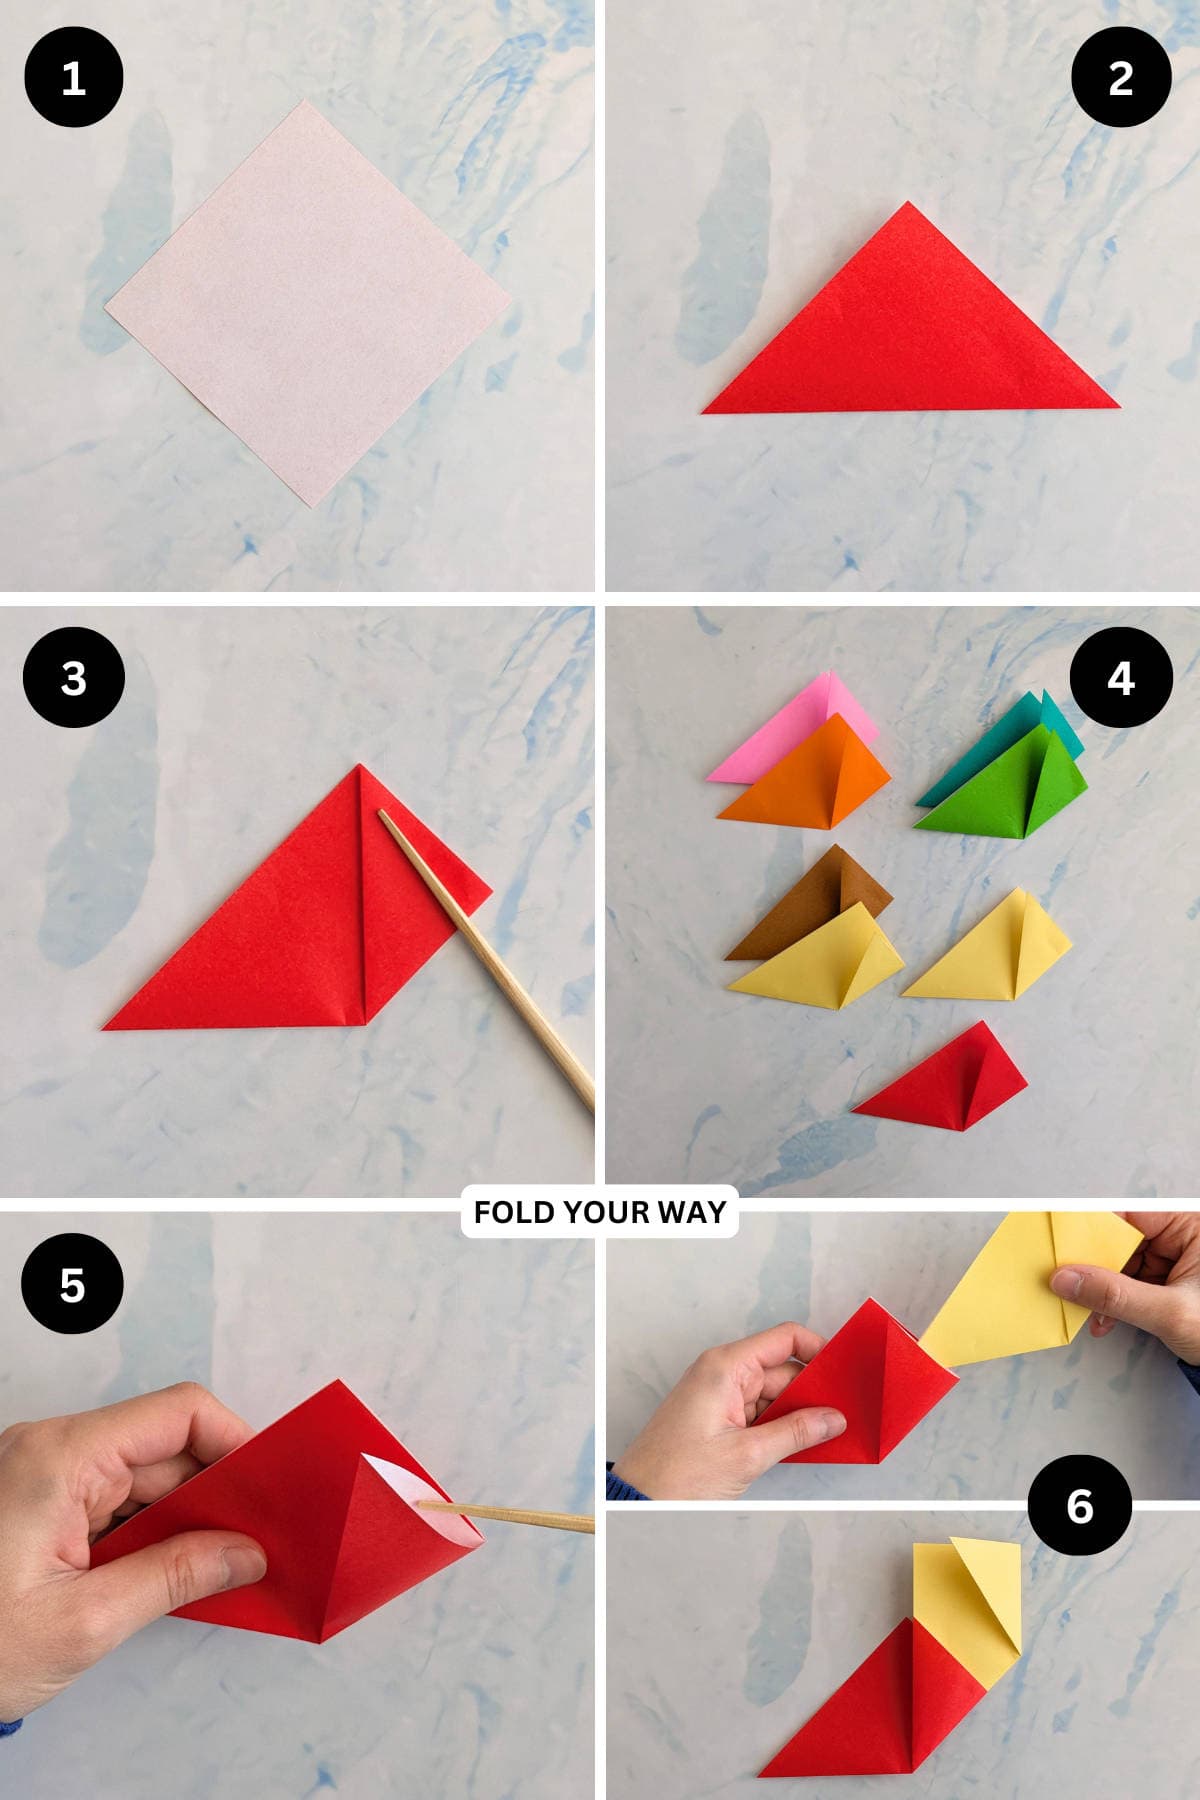
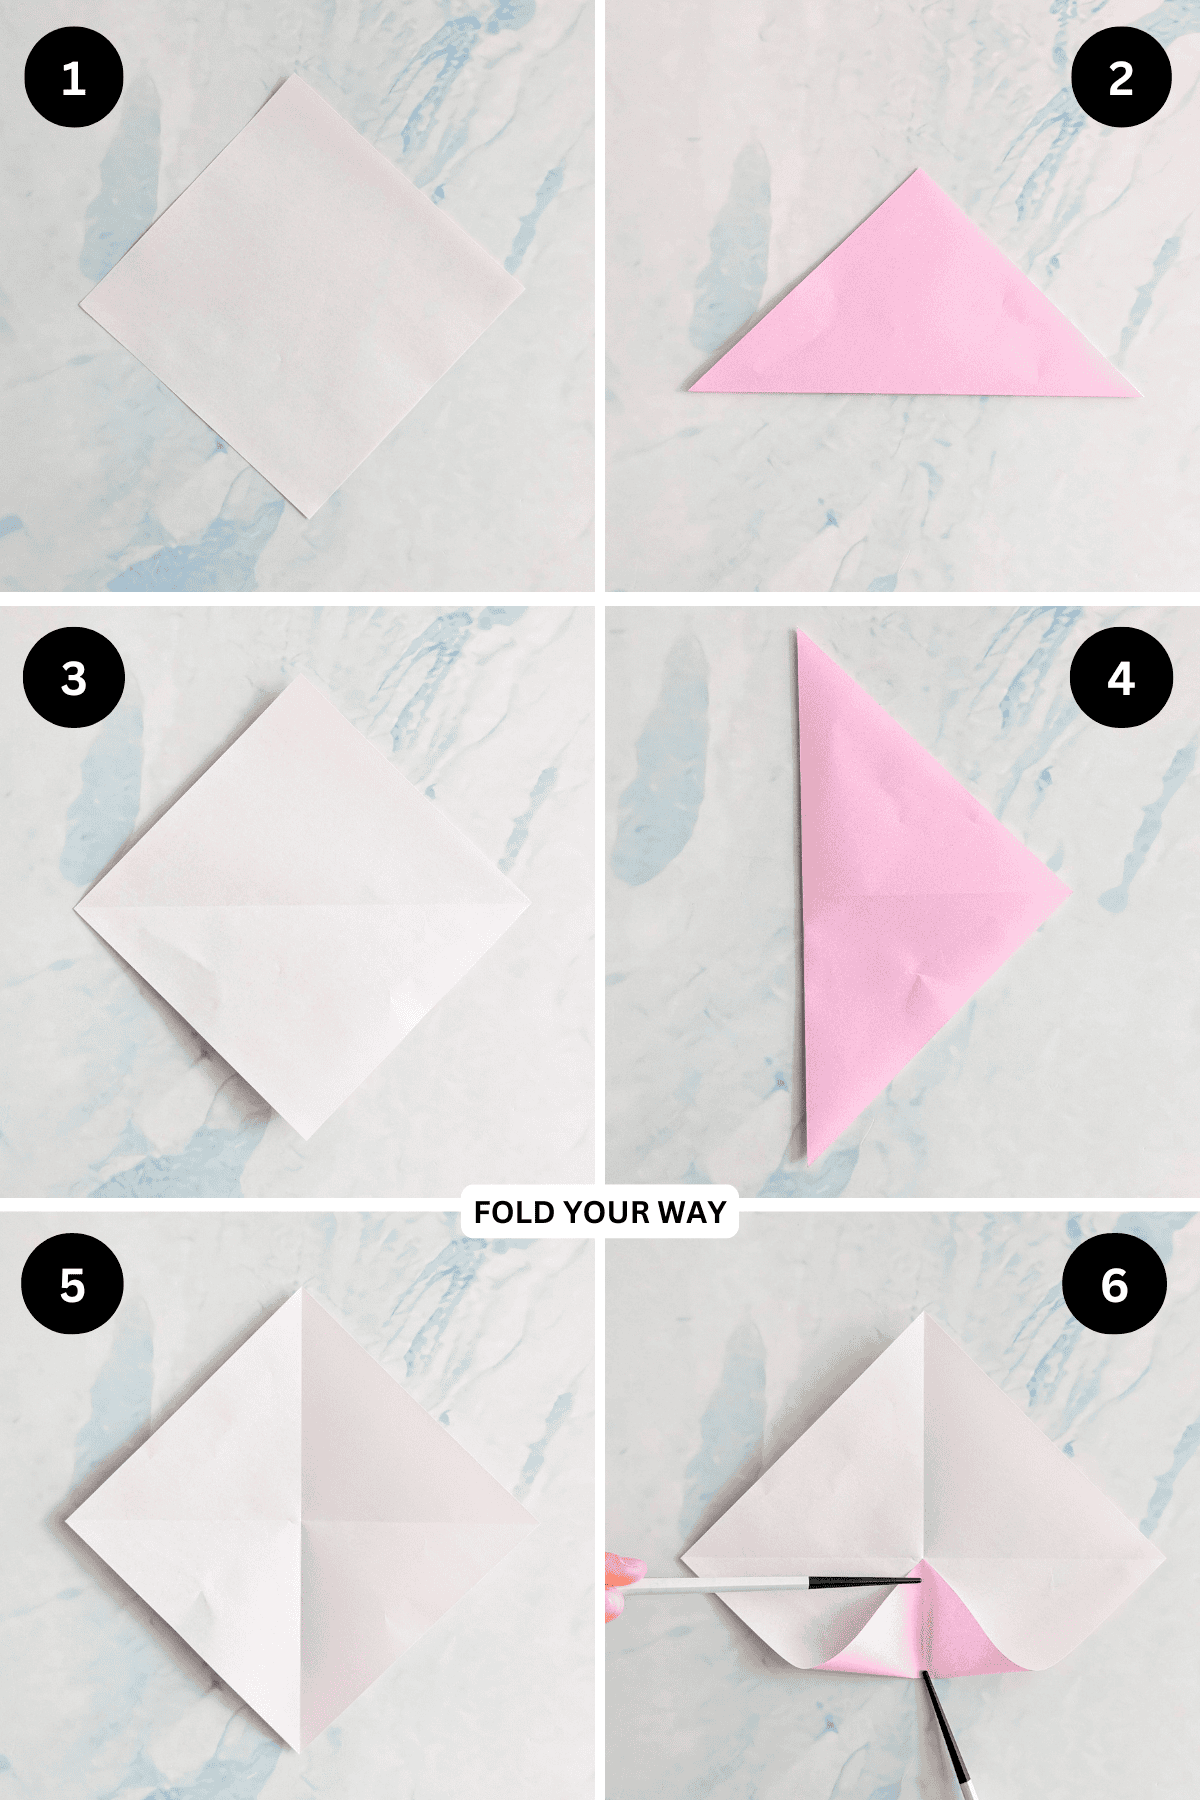
Step 1: Start with one of your pieces of paper. Arrange it to sit like a diamond shape and have the color you want on the outside facing down.
Step 2: Fold the bottom point up to meet the top point.
Step 3: Fold the bottom right point up to meet the top point.
Step 4: Repeat steps 1 to 3 for the remaining pieces of paper. You will end up with 8 folded pieces in total.
Step 5: Take one of your folded pieces, and slightly open out the pocket found on the right side (see picture for guide).
Step 6: Take another piece and slip the point into the pocket. If you like, you can apply some glue to either side of the point before slipping it in.
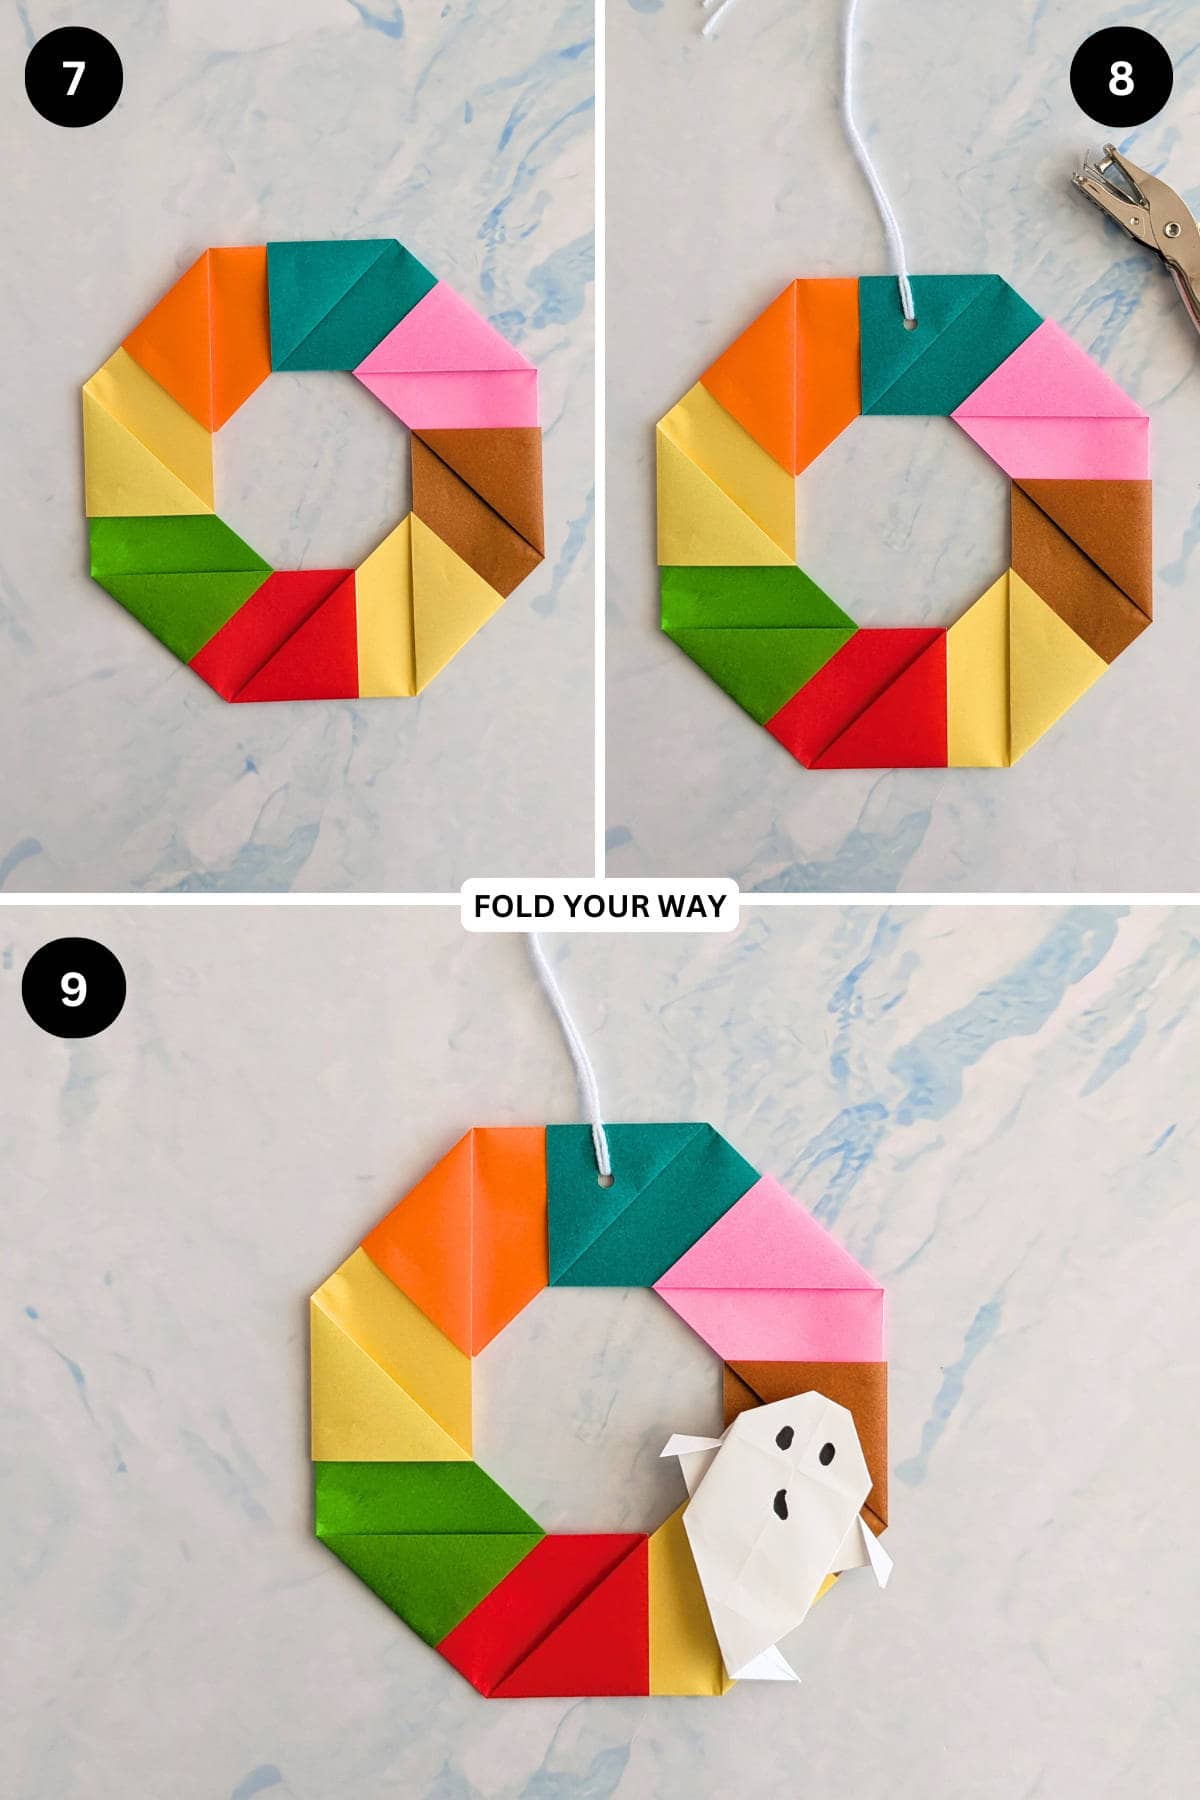
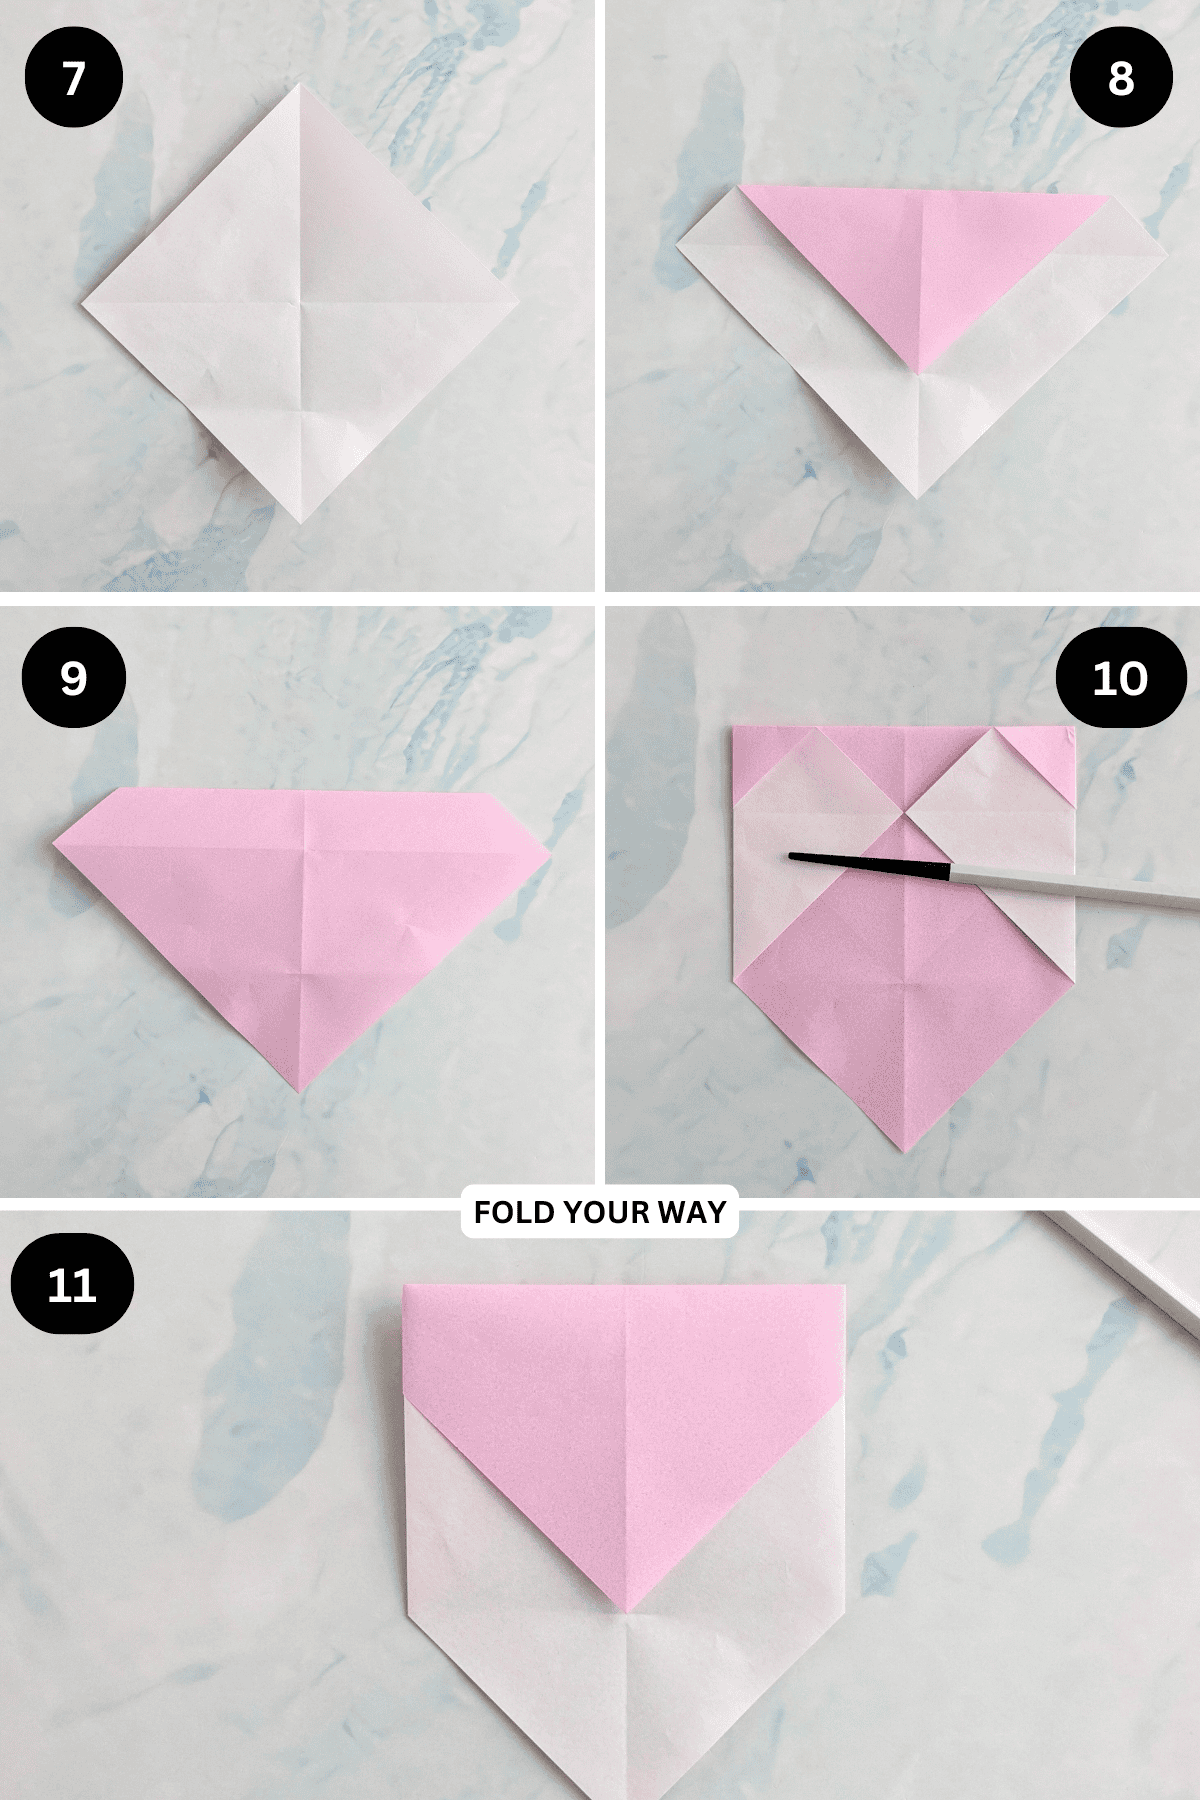
Step 7: Repeat steps 5 and 6 until you have used up all the folded pieces.
Step 8: Choose which side you want as the front and then punch a hole into it as shown (make sure the hole isn’t too close to the edge). Thread some string or twine through so that you can hang it.
Step 9: Decorate your wreath as you like – we have provided instructions below on how to make an easy origami ghost, as well as a 2D origami pumpkin. But feel free to add other things as you like or keep it plain too!
For instructions on how to make the paper origami ghost, see below.
For the origami pumpkin, we recommend using the same size paper you did for the wreath.
MAKING THE PAPER GHOST
Step 1: Start with the color you want your ghost to be facing down. Arrange your paper to sit like a diamond.
Step 2: Fold the bottom point up to meet the top point.
Step 3: Unfold previous step.
Step 4: Fold the left point to meet the right point.
Step 5: Unfold previous step.
Step 6: Fold the bottom point up to meet the middle point, creasing only in the centre as shown.
✨ You're almost there! ✨
To unlock the final steps and complete your pattern, create a free account with Grow.me. below.
Make sure you tick the box to subscribe to our newsletter and stay up to date with the latest patterns, tips, and more!
Once you're signed up, you'll get instant access to finish your project and enjoy exclusive content in the future.
Already signed up? Hit the button below and select ‘Switch to Log In’ to pick up where you left off and finish your project!
Step 7: Unfold previous step.
Step 8: Fold the top point down to meet the crease mark you made in step 6.
Step 9: Flip your paper over from left to right.
Step 10: Fold both the left and right points in to meet the middle.
Step 11: Flip your paper over from left to right.
Step 12: Fold both the left and right edges into meet the middle, bringing the flaps from the back to the front (you don’t want to crease the flaps).
Step 13: Working on the right flap: Lift up the top corner as shown, then bring it down to form a triangle.
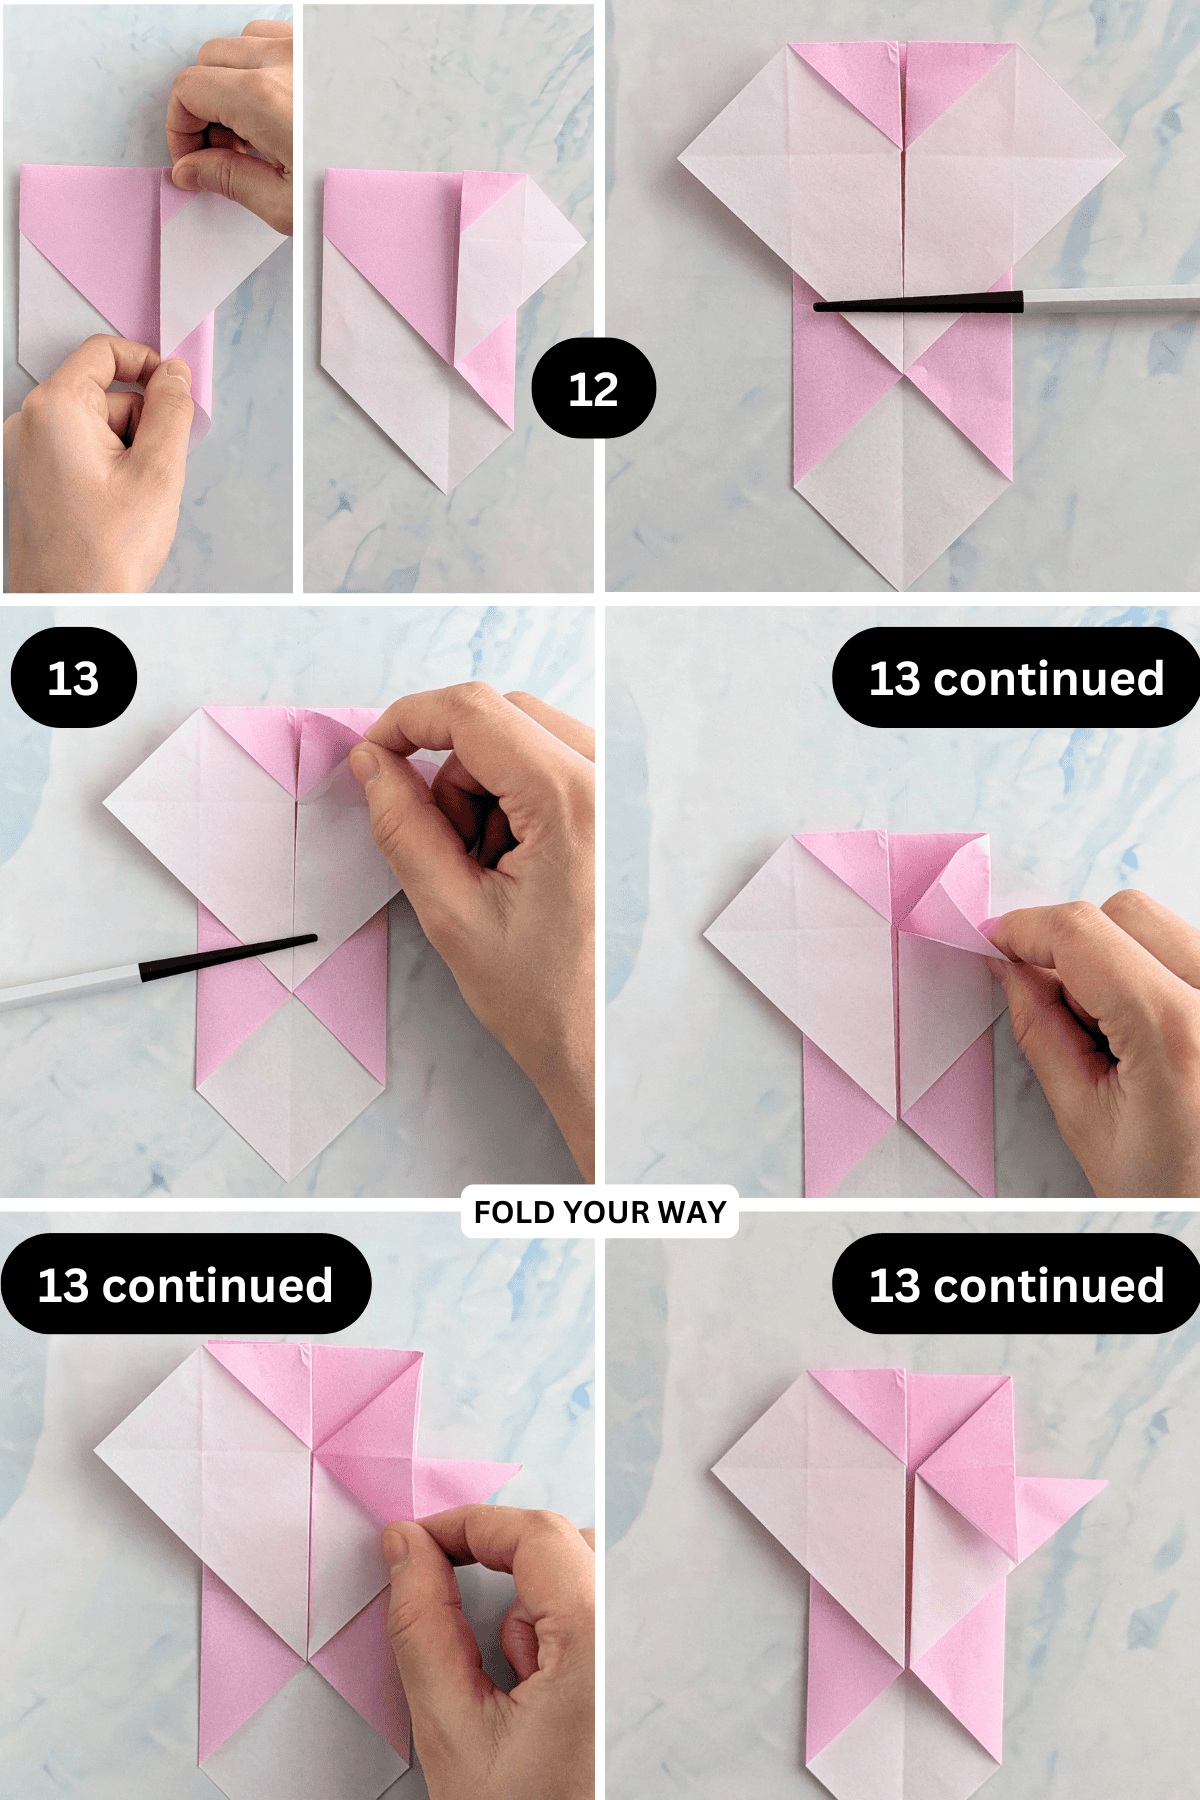
Step 14: Repeat previous step for the left flap.
Step 15: Fold both the bottom left and bottom right edges in to meet the middle.
Step 16: Fold the bottom point up as shown.
Step 17: Fold the top left and top right corners in slightly.
Step 18: Flip your paper over from left to right.
Step 19: Fold both the left and right points down slightly on a diagonal. These will be the hands of your ghost.
Completed ghost – decorate with markers. Then stick on your wreath!

Tips For Success
- Use thinner origami paper rather than heavy cardstock — it folds neatly and holds its shape.
- Make sure each fold is sharp; crisp creases help the modular pieces lock together.
- A small dab of glue can make the wreath sturdier, especially if you plan to hang it outside.
- Punch your hanging hole before adding decorations so you don’t crush your ghosts or pumpkins.

Common Mistakes & How To Avoid Them
- Choosing thick paper that’s difficult to fold — stick with origami or construction paper for best results.
- Adding too many decorations — a few pumpkins and ghosts look charming, but too many can overwhelm your easy Halloween paper wreath.
Color, Paper Ideas, and Variations
- Classic Halloween: Alternate black and orange modules for a traditional look.
- Haunted house style: Use black and purple, then decorate with white origami ghosts.
- Pumpkin patch theme: Create the wreath in shades of orange and scatter mini paper pumpkins around it.
- Monochrome: Build the base in all black and keep the decorations white for a dramatic contrast.
- Family-friendly: Mix in bright green, purple, and orange, with playful ghost faces drawn in marker.
FAQ
Eight square sheets for the wreath base, plus extra sheets for folding pumpkins and ghosts.
No — the modular origami design locks into place. But glue can make your easy Halloween paper wreath sturdier, especially for hanging outdoors.
Other Paper Crafts You Might Like To Try:
Helpful Tips and Common Mistakes For Paper Crafts
Paper crafting and origami can be hard sometimes. Which is why we've made this printable PDF just for you.
It outlines helpful tips so that you can successfully complete your craft, and some of the most common mistakes people come across.
You can download the helpful tips and common mistakes for paper crafts printable PDF here.
Stay Connected
Made this pattern? Let us know how it went in the comments below!
Pin this post - Pin now to take your paper crafting skills to the next level.
Share on Instagram or Facebook - Capture the beauty of your finished paper craft project and share it on Instagram or Facebook! Tag us @foldyourway so we can see your work!
Other Patterns You Might Like To Try:
Looking for other easy patterns like this? Try these:


Comments
No Comments