
Add a festive touch to your Christmas table with this simple Santa hat napkin folding idea — made with just two square paper napkins! Quick, cute, and perfect for holiday meals.
Jump to:
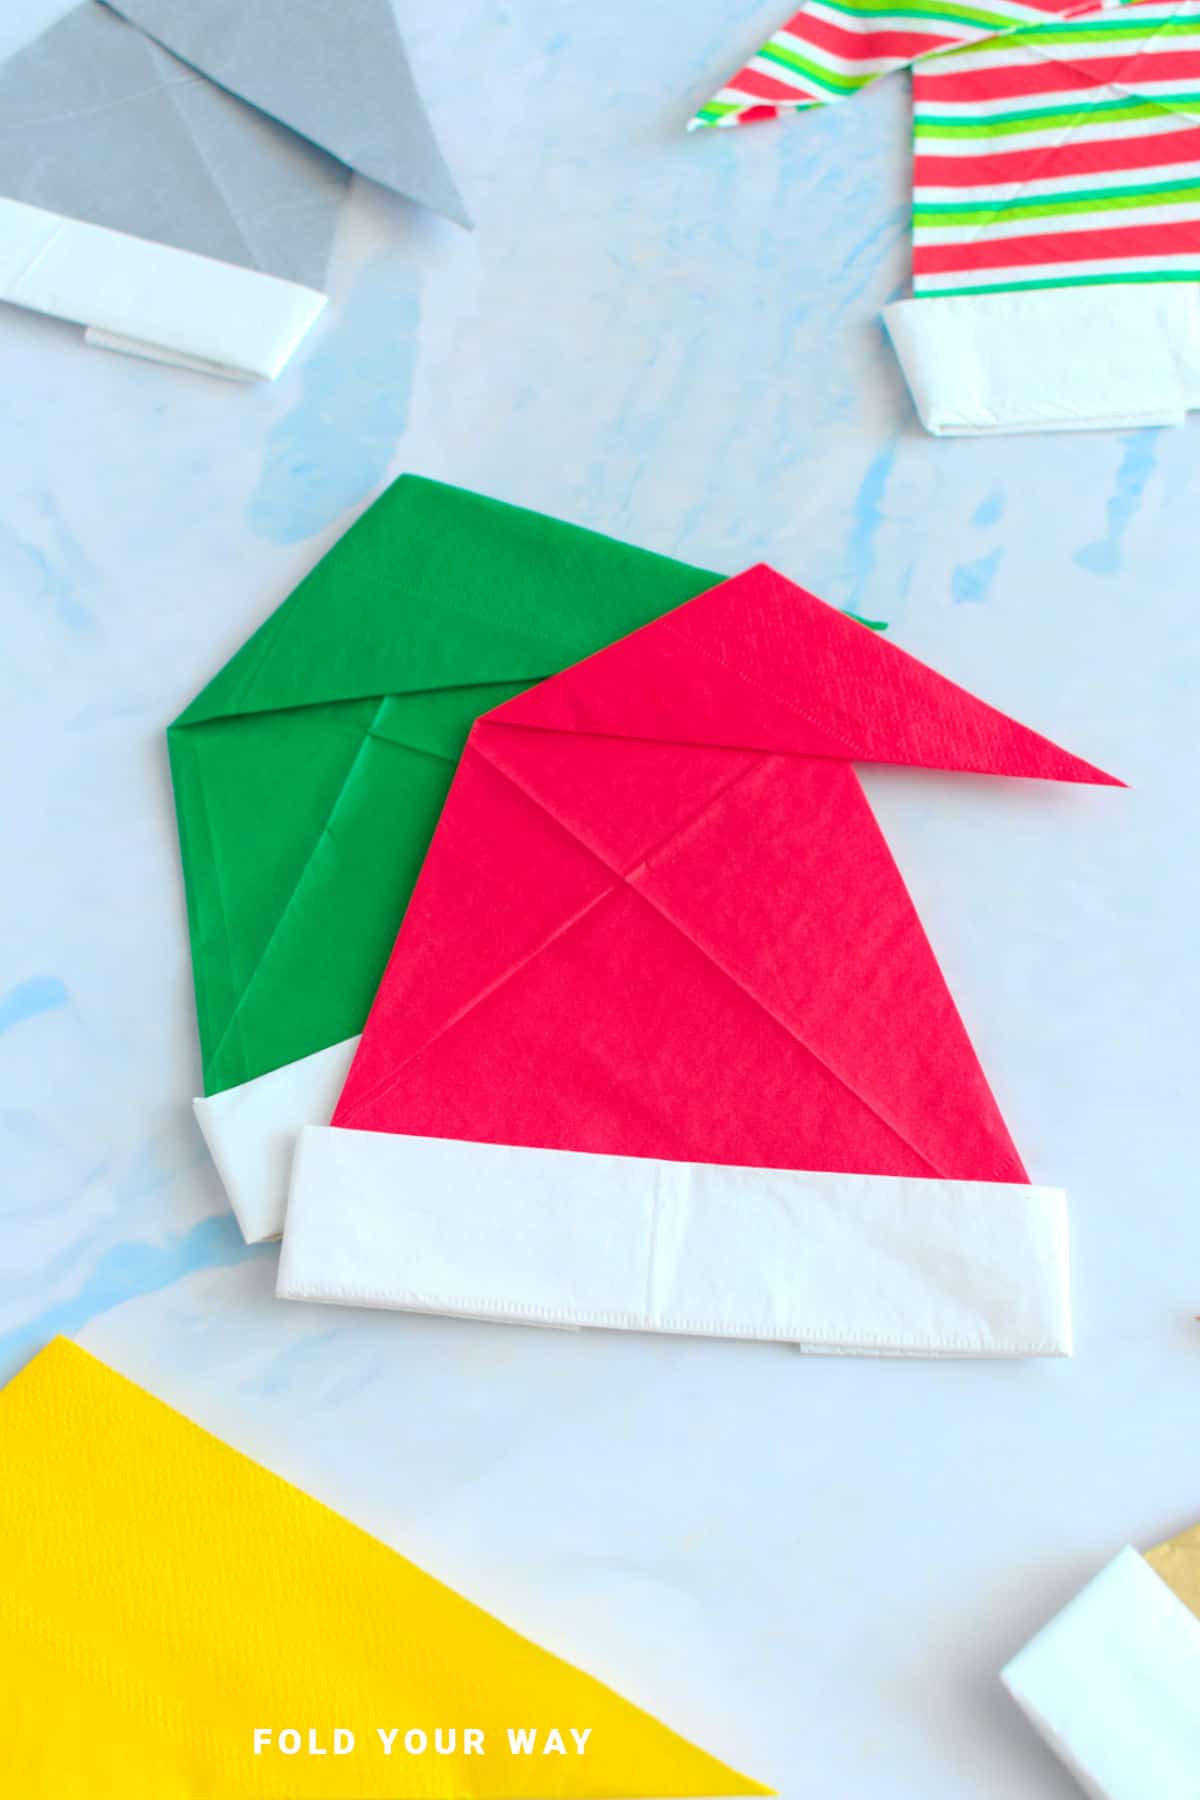
If you're setting the table for Christmas breakfast, dinner, or a festive get-together, this santa hat napkin fold is a fun way to bring a bit of cheer to each place setting.
It’s made with just two square napkins—one red (or patterned) and one white—and folded into a cone shape to resemble Santa’s iconic hat, complete with a white brim and fluffy tip.
No glue or extra tools needed, and it comes together in just a few steps!
This napkin fold looks especially cute perched on a plate or tucked into a glass.
It’s a great option for Christmas Eve dinners, office parties, classroom celebrations, or even Christmas morning brunch.
Plus, it works just as well with cloth napkins as it does with paper ones.
Whether you’re keeping things casual or going all out with your table decorations, this santa hat napkin fold is a charming detail that takes just minutes to make.
It’s also a fun way to get kids involved in holiday prep—they’ll love folding and helping place each hat!

Why You'll Love This Pattern
- Simple and festive detail for your holiday table
- Quick and easy to make with minimal materials
- Works with both paper and cloth napkins
- Great for casual family meals or more formal Christmas gatherings
- A fun way to involve kids in decorating
- Doubles as a thoughtful handmade touch at each place setting
- Can be made in advance or last minute (as they are so easy and quick to make!)
Skill Level
★☆☆☆☆ (Very Easy)
Materials Needed
- 1 red or patterned square paper napkin
- 1 white square paper napkin (for the trim)
Note: make sure your paper napkins are the same size.
A Santa hat napkin fold made with 5 inches x 5 inches (12.5 cm x 12.5 cm) will make a napkin fold that is about 7.5 inches x 6.5 inches (19 cm x 17 cm)
Instructions
Step 1: Start with your colored napkin unfolded completely. Make sure the color you want your hat to be is facing down. Arrange your napkin to sit like a diamond shape as shown.
Typically, napkins come folded into quarters, so when you open out your napkin it should fold out into a larger square with 2 creases which divide the napkin into 4 smaller squares.
Step 2: Fold both the upper left and upper right edges in to meet the middle.
Step 3: Fold the bottom point up as shown.
Step 4: Fold the top point down on a slight angle. Set aside.
Step 5: We will now make the strip of the hat. Let’s use your white colored napkin. Once again, unfold the napkin completely and start with the good side facing down.
Step 6: Fold the bottom edge up to meet the top edge.

✨ You're almost there! ✨
To unlock the final steps and complete your pattern, create a free account with Grow.me. below.
Make sure you tick the box to subscribe to our newsletter and stay up to date with the latest patterns, tips, and more!
Once you're signed up, you'll get instant access to finish your project and enjoy exclusive content in the future.
Already signed up? Hit the button below and select ‘Switch to Log In’ to pick up where you left off and finish your project!
Step 7: Once again, fold the bottom edge up to meet the top edge.
Step 8: One more time, we will fold the bottom edge up to meet the top edge.
Step 9: Unfold previous step.
Step 10: Place the colored napkin you folded on top of the white napkin as shown. Line the bottom edge of the colored napkin with the crease you made in step 8.
Step 11: Fold the bottom edge of the white napkin up to meet its top edge using the existing crease line.
Step 12: Fold both the left and right sides of the napkin in slightly.
Step 13: Flip your napkin over from left to right. Completed Santa hat napkin fold.

Tips For Success
- Use a napkin with a bit of structure so the cone holds its shape.
- You can swap red for green or patterned Christmas napkins for a twist.
- Tuck a small sweet or chocolate inside each folded hat for an extra treat!

Color, Paper Ideas, and Variations
- Red + white – the classic Santa combo.
- Green + white – perfect for a fun twist or Grinch-themed tables.
- Patterned napkins – try festive prints like snowflakes or holly.
- Gold or silver napkins – elegant look for more formal tables.
- Add extras – tuck in a name tag, candy cane, or mini ornament.
FAQ
Yes! Cloth works well - just press between steps to keep folds crisp.
Not at all. The folds hold everything in place if made tightly.
Absolutely! It’s a great way to get them involved in decorating the holiday table.
Other Paper Crafts You Might Like To Try:
Stay Connected
Made this pattern? Let us know how it went in the comments below!
Pin this post - Pin now to take your paper crafting skills to the next level.
Share on Instagram or Facebook - Capture the beauty of your finished paper craft project and share it on Instagram or Facebook! Tag us @foldyourway so we can see your work!

Other Patterns You Might Like To Try:
Looking for other easy patterns like this? Try these:


Sarah says
Was looking for inspiration for Christmas and I'm glad I came across these. So cute, so gonna make this Christmas. Can't wait!!