
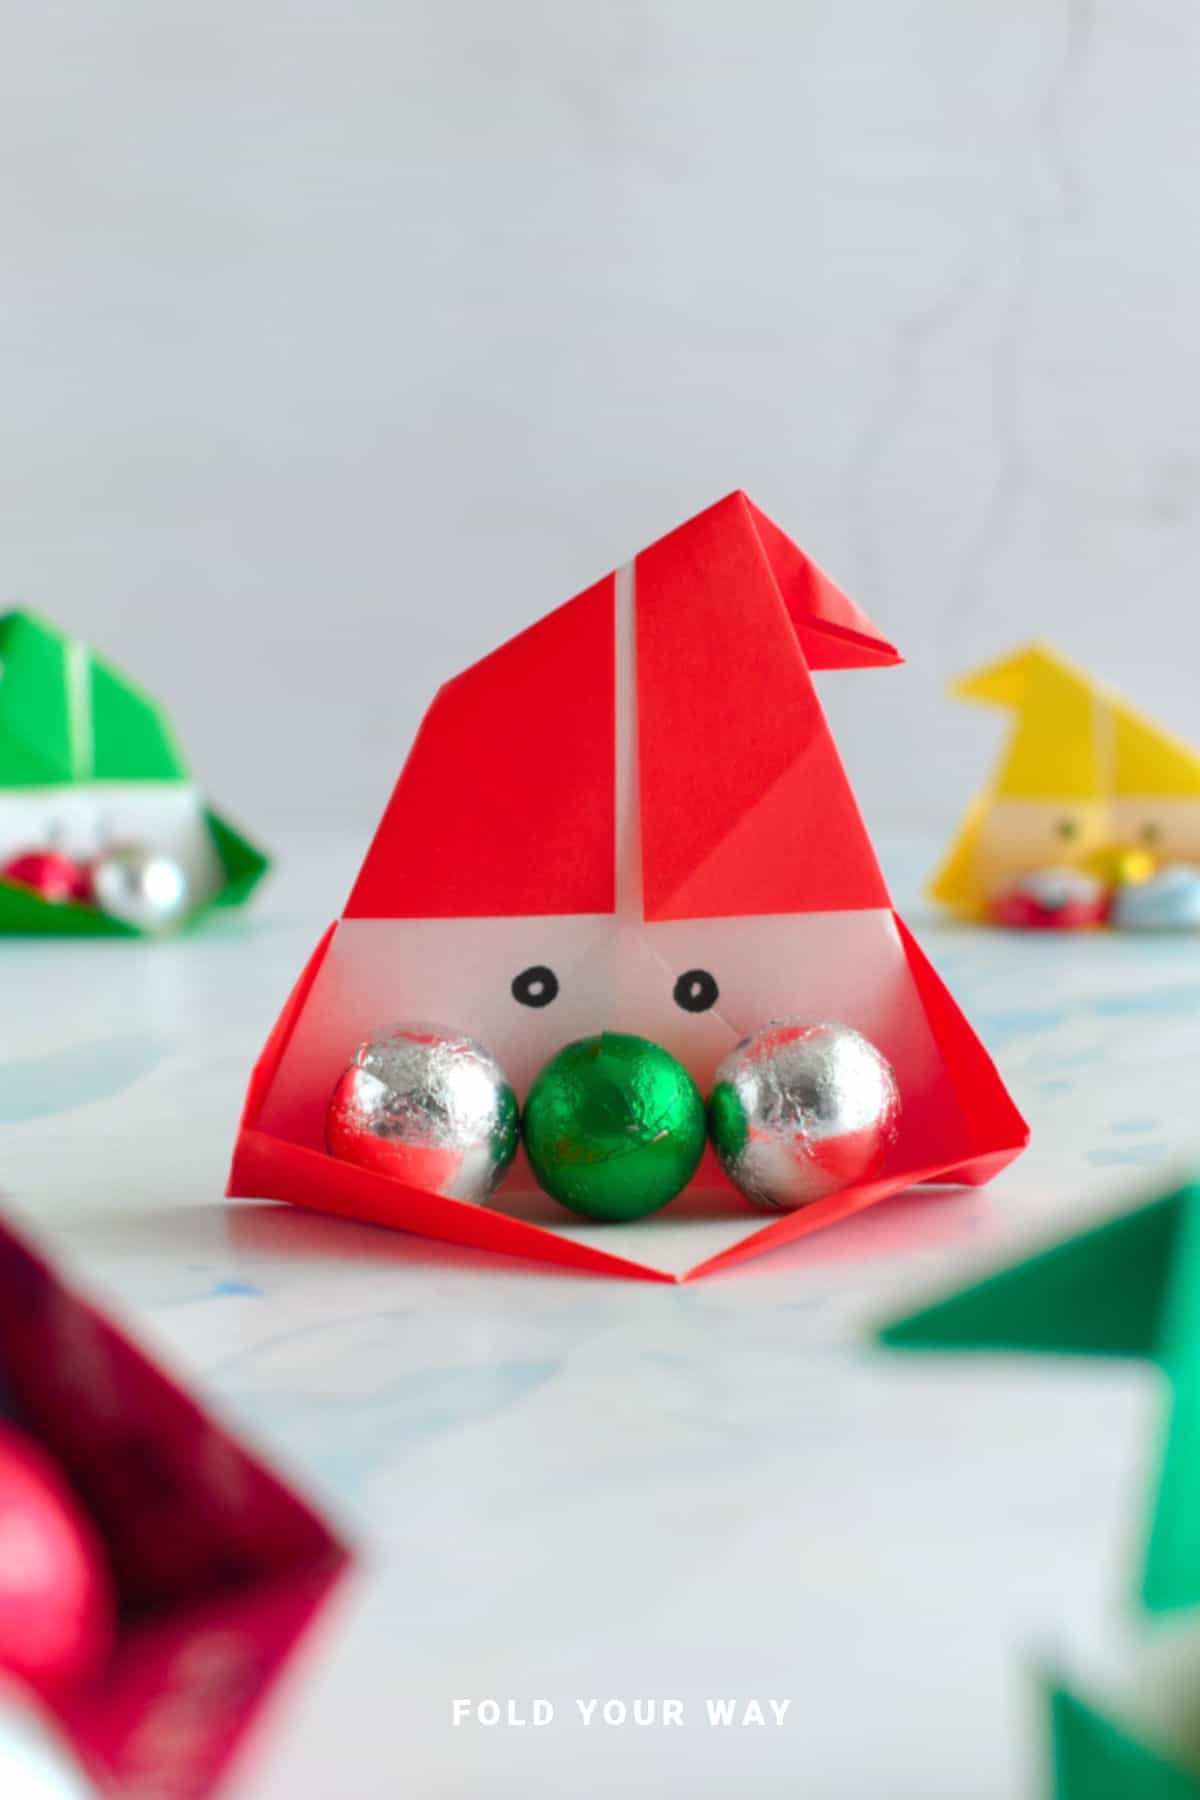
Create a charming Santa origami box using just one sheet of paper—no glue or scissors needed.
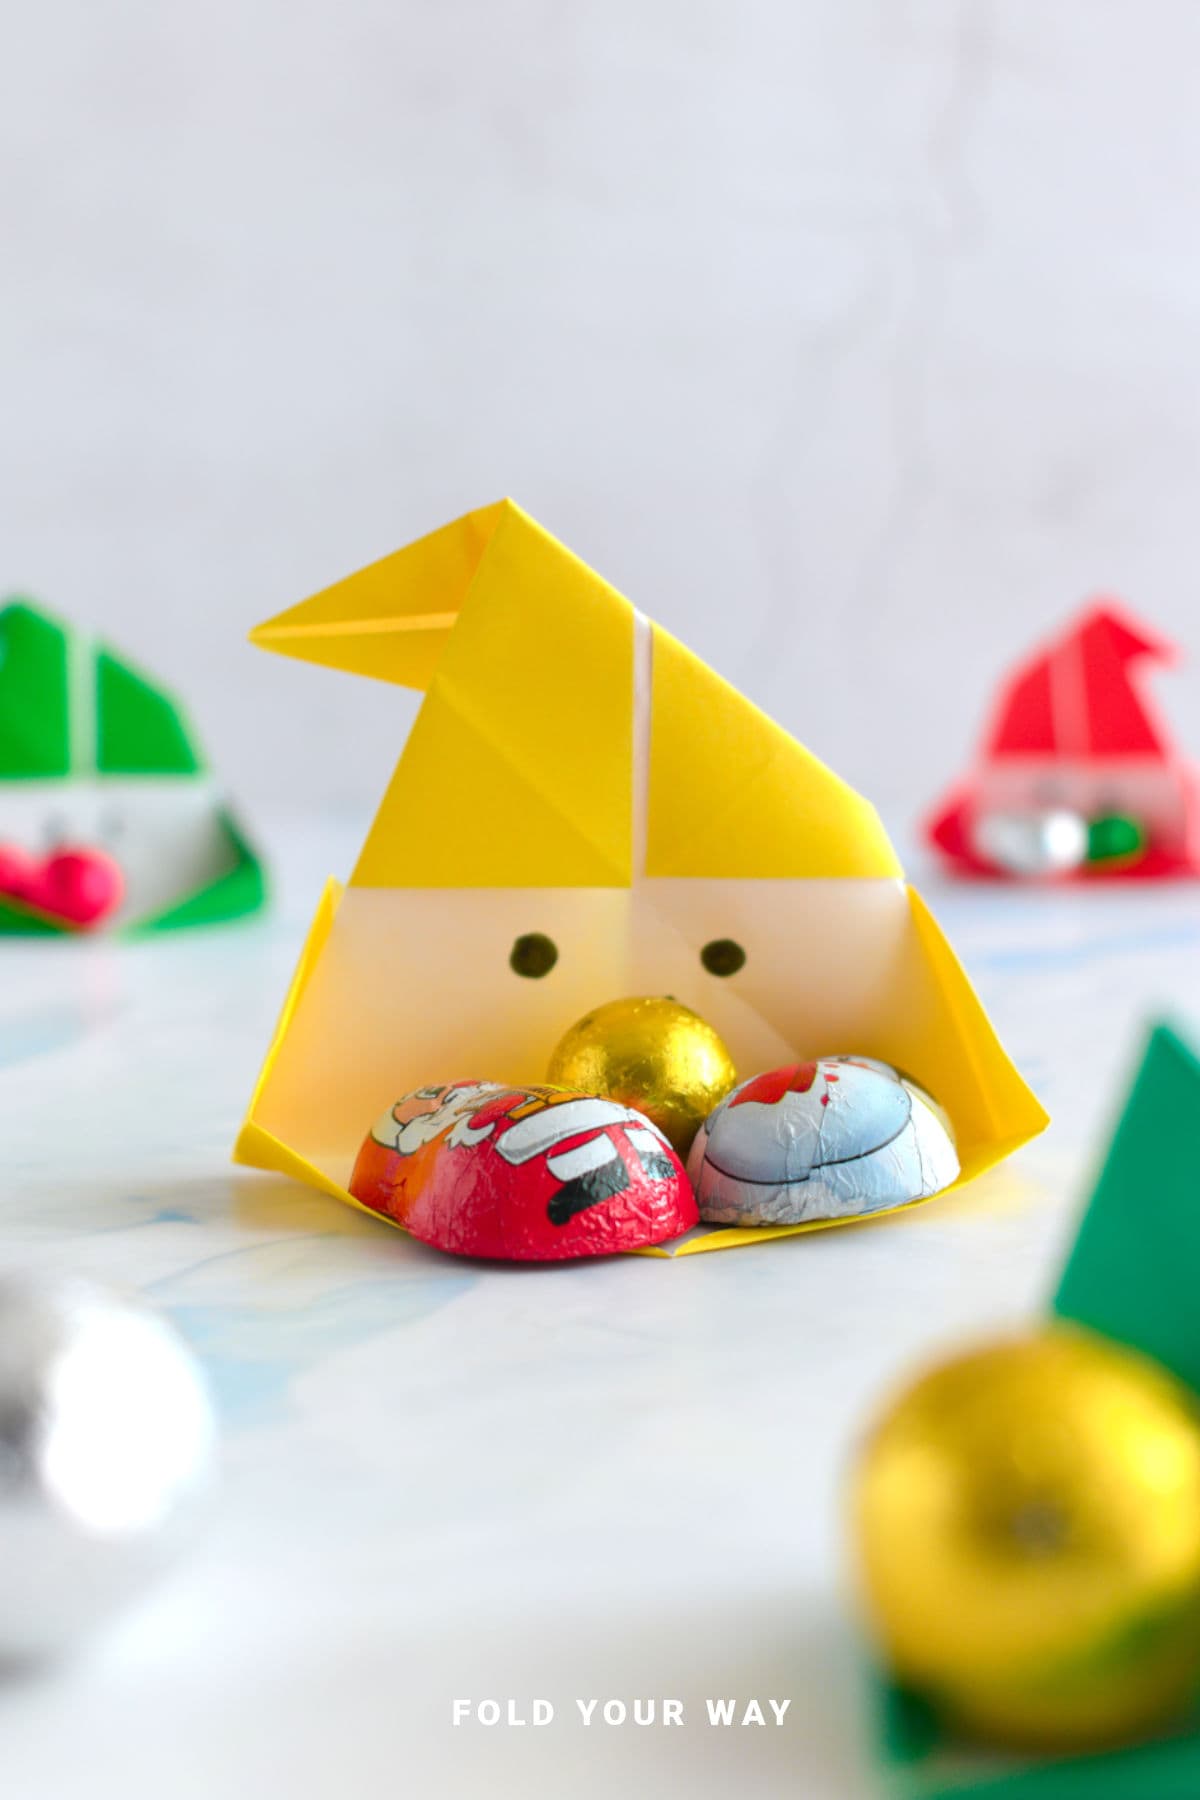
Perfect for holiday table decorations, this festive box can hold candies, chocolates, or name tags, adding a personal touch to your gatherings.
With step by step instructions, this easy DIY tutorial is ideal for beginners and anyone wanting a cute, functional paper craft that captures the spirit of the season.
Make your holiday setup merry and bright with this beautiful origami project.
Jump to:
Holiday entertaining is all about those small, thoughtful touches that make your table feel warm and inviting.
This Santa origami box is one of those clever paper crafts that looks delightful while also being genuinely useful.
Crafted from a single sheet of paper folded carefully to resemble Santa himself, this box isn’t just a pretty decoration—it’s a small container perfect for holding candies, chocolates, or even name tags for your guests.
What makes this project especially appealing is how quickly it comes together. The design uses no glue or scissors, relying solely on folding to form the box and Santa’s iconic red-and-white look.
Even if you’re new to origami, this tutorial breaks down the process into simple, easy-to-follow steps that result in a clean, festive box.
It’s a fantastic addition to holiday tables, giving guests a small treat or a personalized place setting they’ll remember.
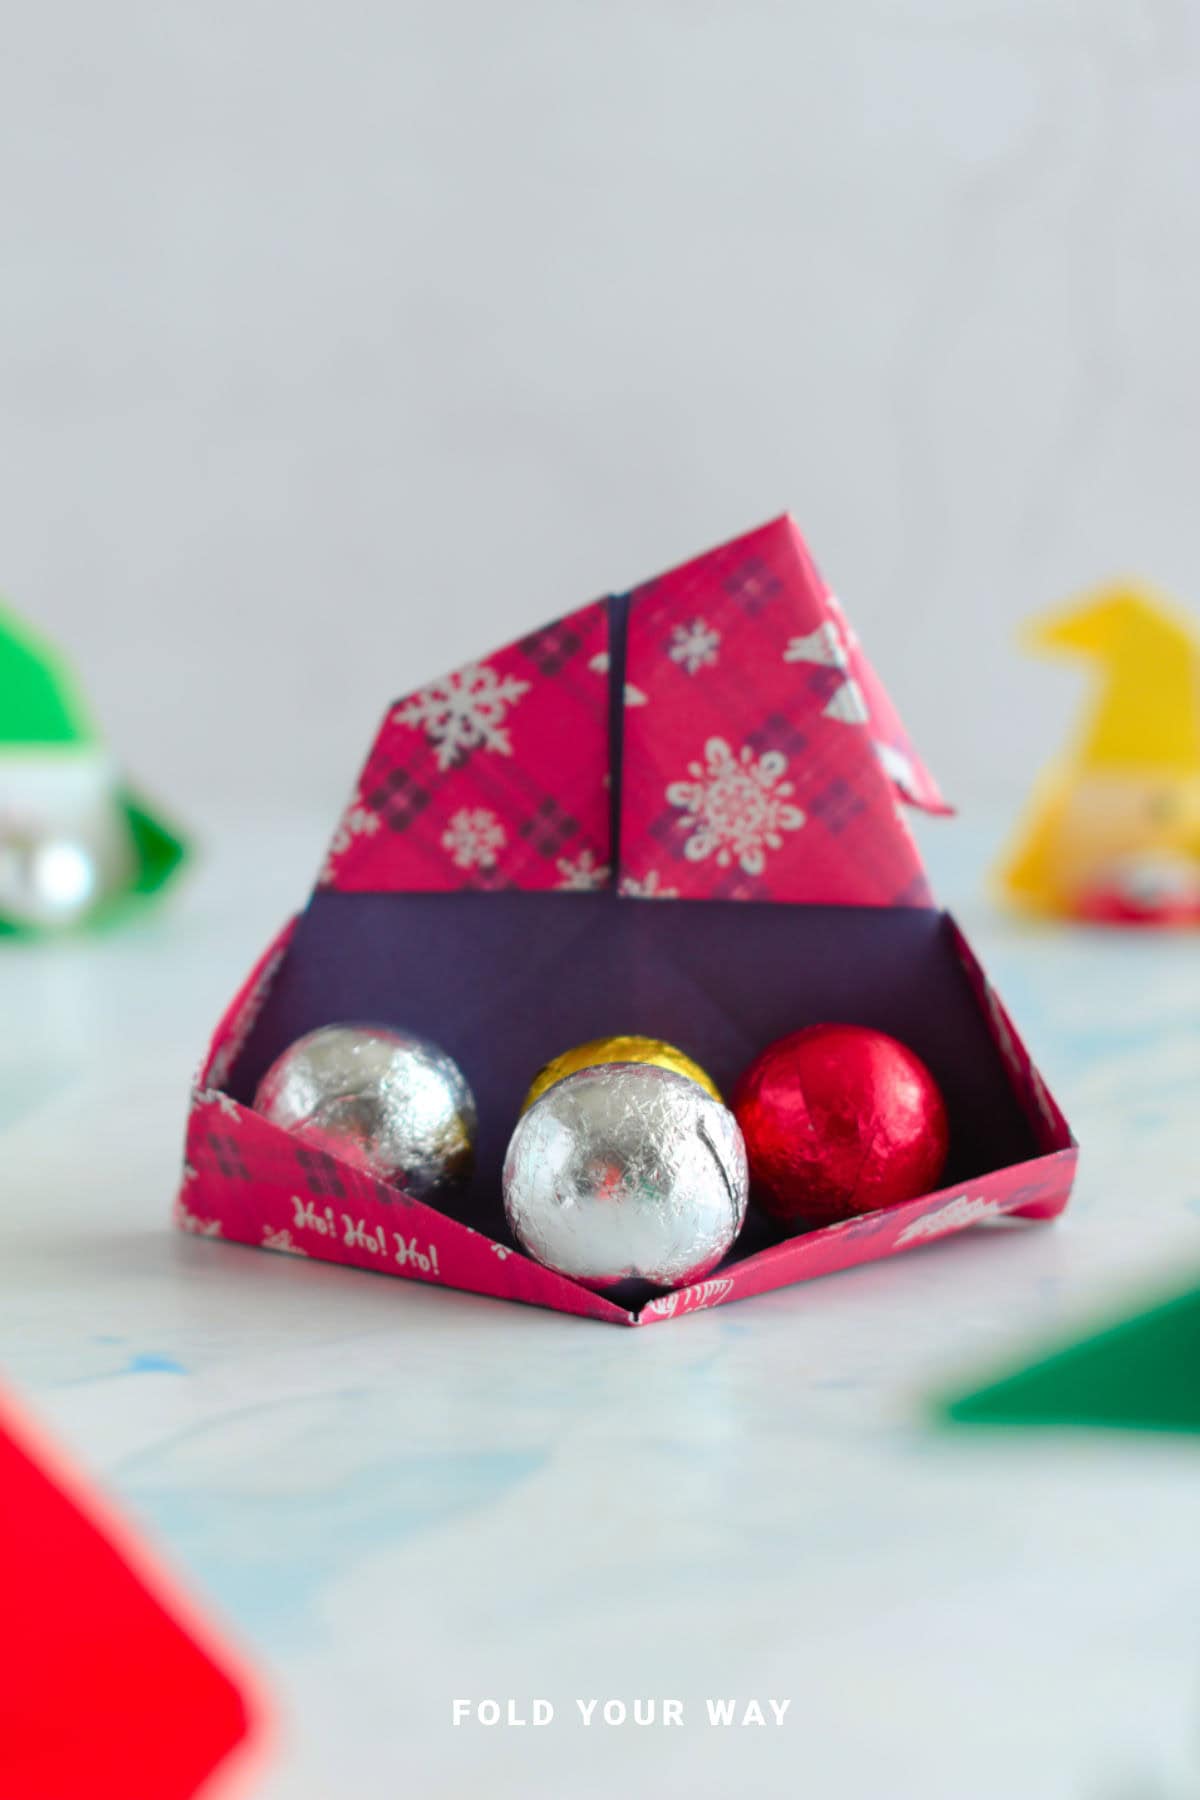
Because it’s made from just one sheet, this santa box is also super budget-friendly and customizable.
You can use red paper for the classic Santa suit or get creative with patterned paper featuring holiday motifs.
For a snowy effect, try using white paper with red accents or add small paper details like a beard or hat trim with markers or stickers.
Beyond the dining table, these boxes work well as stocking stuffers, party favors, or small gift containers.
Their compact size makes them easy to tuck into gift bags or to arrange in a festive display. Plus, the folding process itself is a fun holiday activity for families or craft groups.
Overall, this Santa origami box blends the fun of paper folding with practical use and festive cheer.
Whether you’re hosting a big Christmas dinner or looking for a creative holiday project, this easy origami idea delivers a beautiful, charming result with minimal fuss.
Why You'll Love This Pattern
- Simple one-sheet design with no glue or scissors
- Great for holiday table décor and personalized place settings
- Holds candy, chocolates, name tags, or small treats
- Beginner-friendly with clear step by step instructions
- Customizable with different papers and decorations
- Compact, reusable, and budget-friendly
Skill Level
★★☆☆☆ (Easy)
Materials Needed
- 1 square sheet of paper (preferably red on one side, white on the other)
- Note: an origami Santa box made with 6 inch x 6 inch (15 cm x 15 cm) paper makes a box that is about 3.5 inches x 1.5 inches (9 cm x 4 cm).
- Optional: marker or stickers for facial details or accents
Instructions
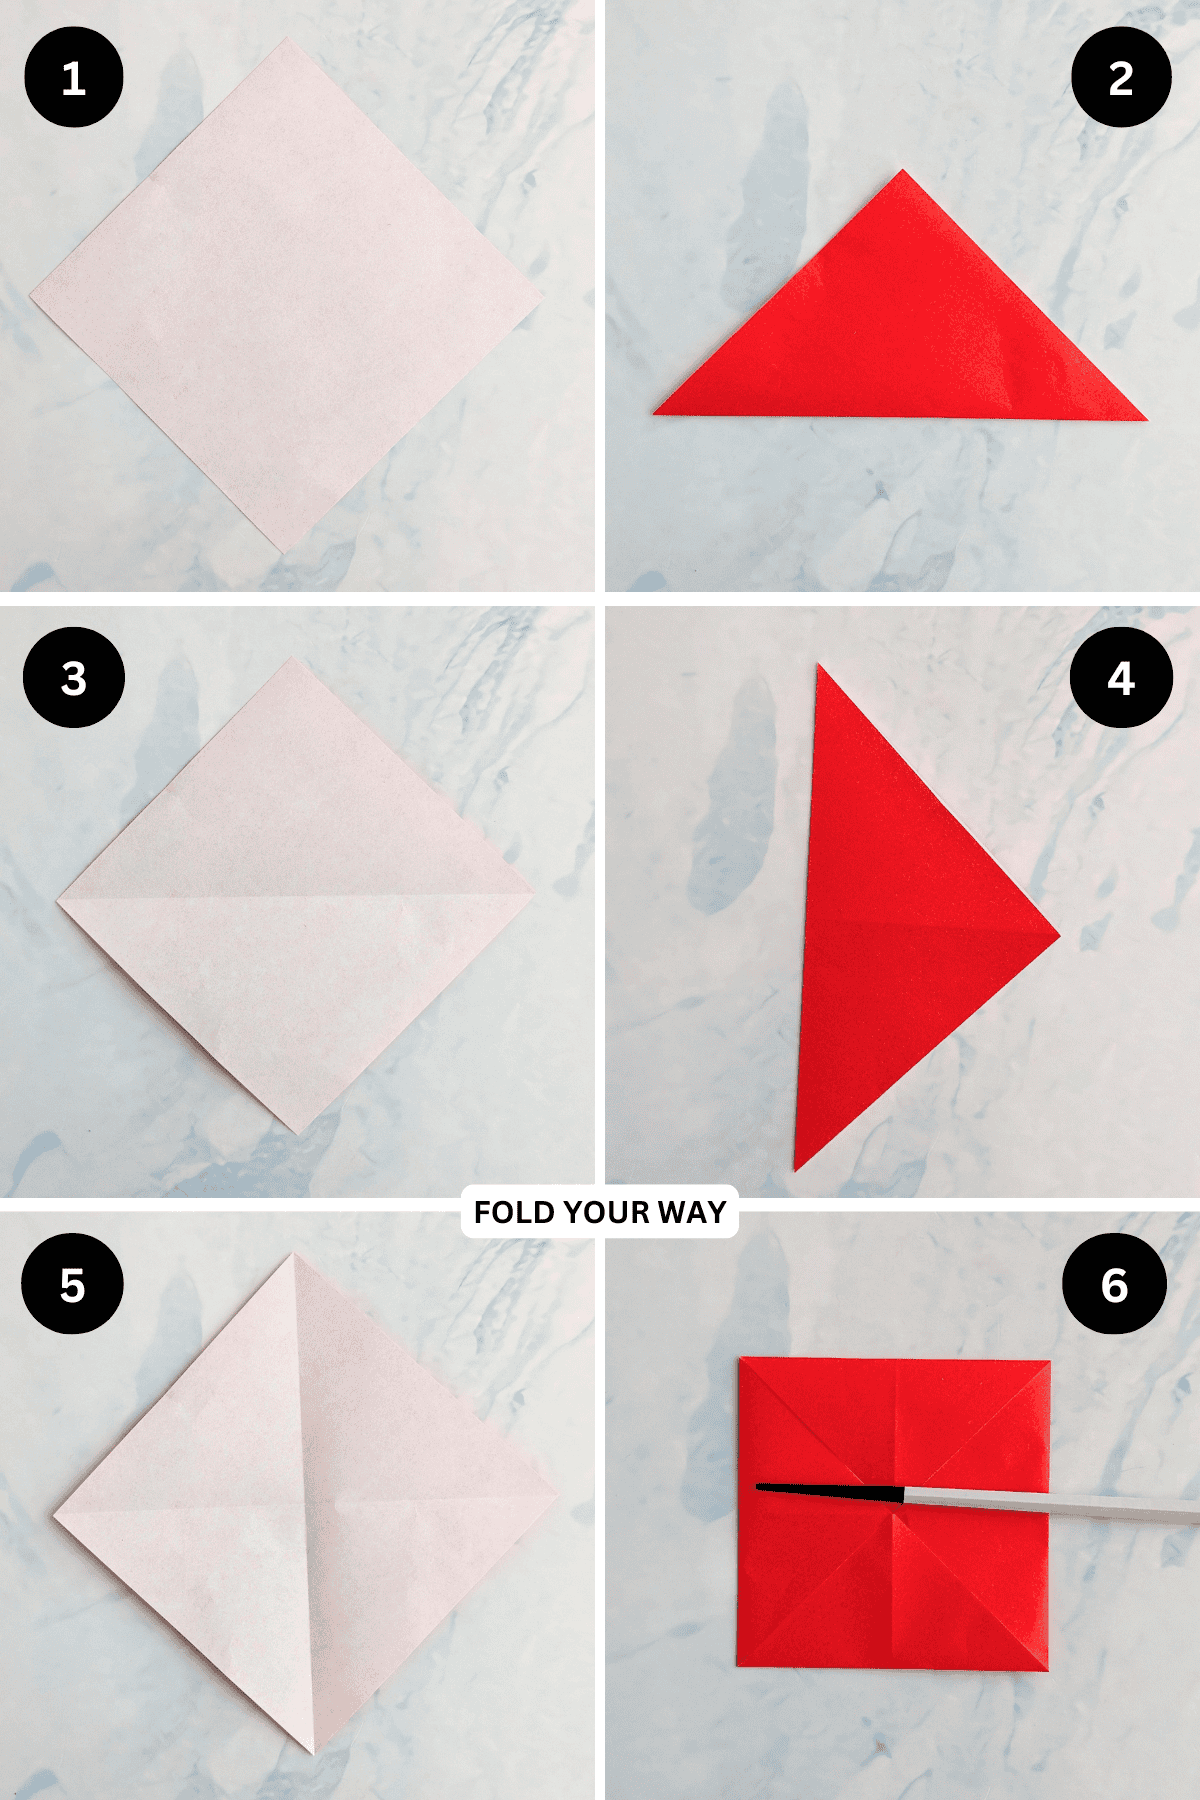
Step 1: Start with the color you want your Santa hat and body to be facing down. Arrange your paper to sit like a diamond shape.
Step 2: Fold the bottom point up to meet the top point.
Step 3: Unfold previous step.
Step 4: Fold the left point to meet the right point.
Step 5: Unfold previous step.
Step 6: Fold all four corners in to meet the middle.
✨ You're almost there! ✨
To unlock the final steps and complete your pattern, create a free account with Grow.me. below.
Make sure you tick the box to subscribe to our newsletter and stay up to date with the latest patterns, tips, and more!
Once you're signed up, you'll get instant access to finish your project and enjoy exclusive content in the future.
Already signed up? Hit the button below and select ‘Switch to Log In’ to pick up where you left off and finish your project!
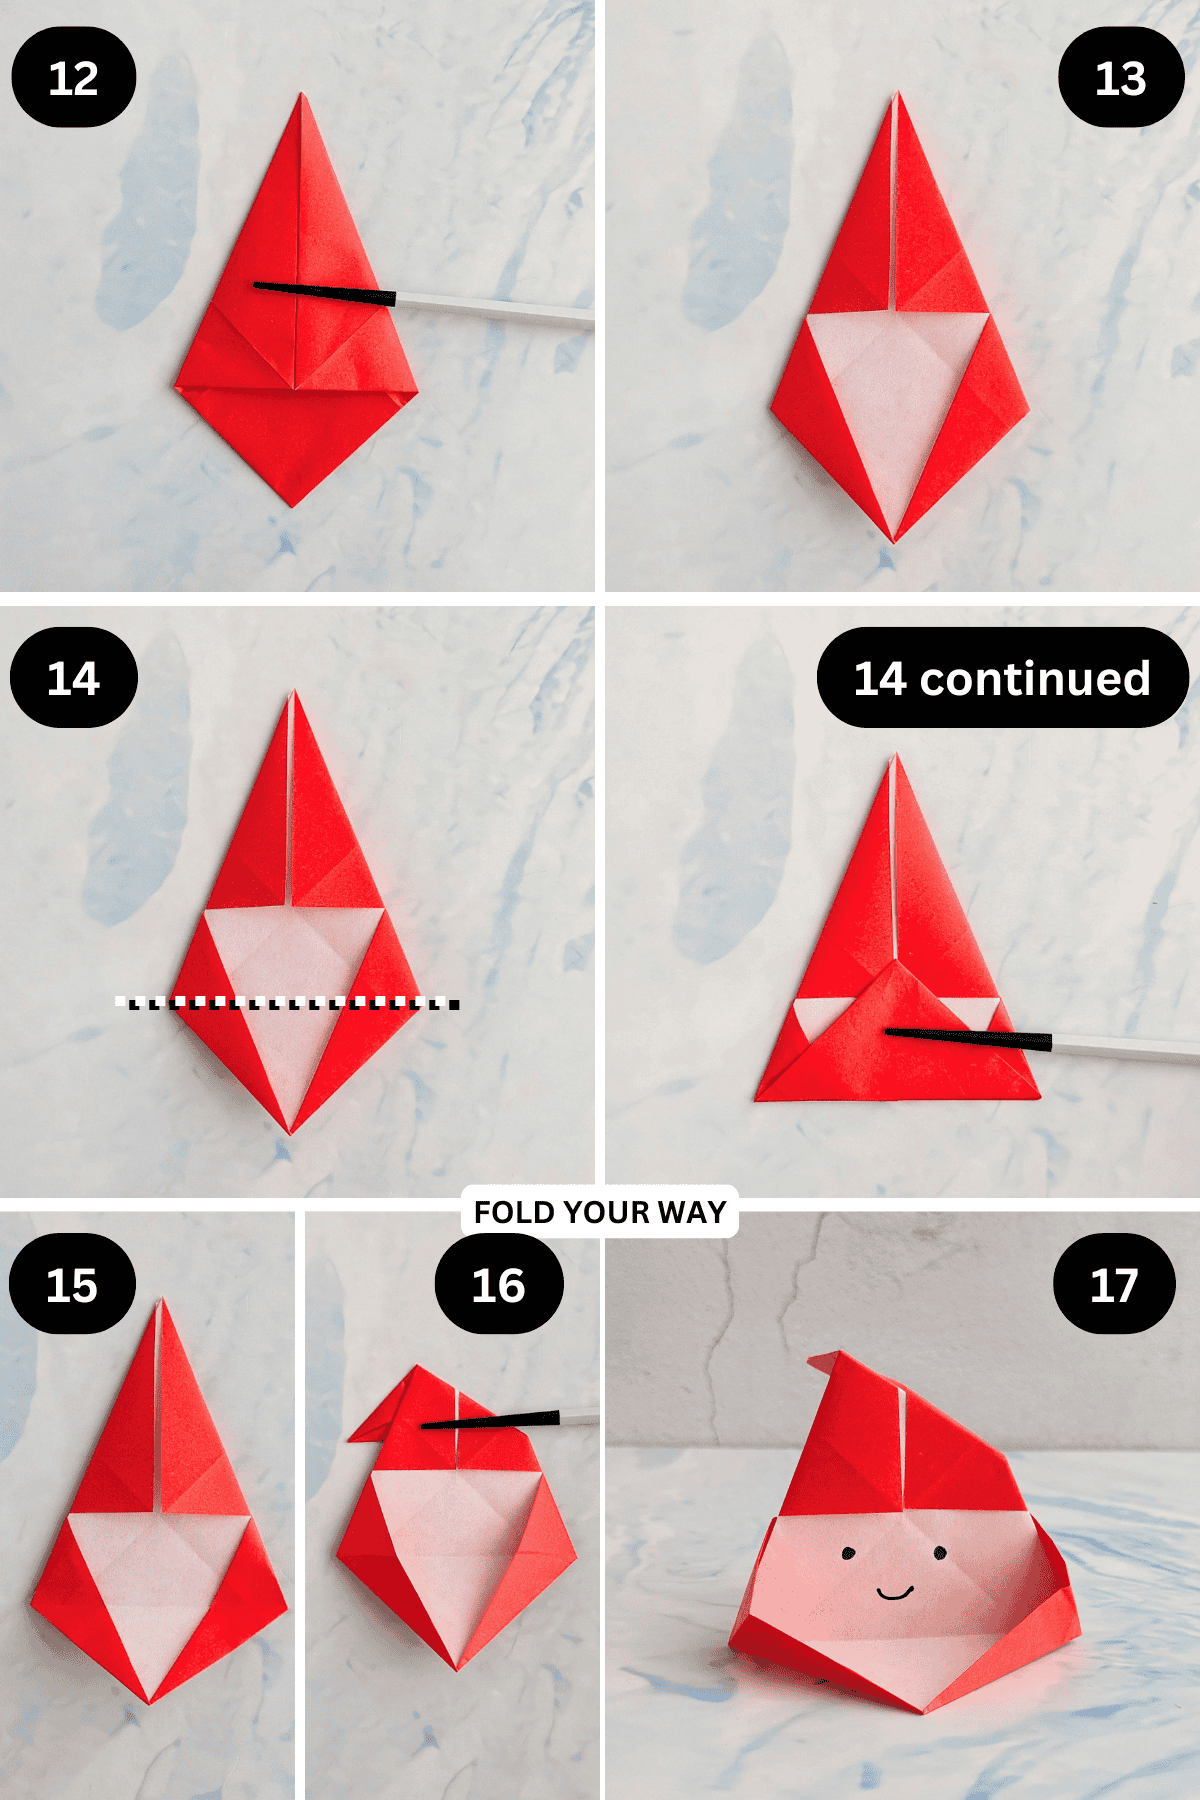
Step 7: Unfold both the bottom and left sections as shown.
Step 8: Rotate your paper to sit as shown.
Step 9: Fold the bottom left and bottom right edges in to meet the lines shown.
Step 10: Re fold the bottom corners in to meet the middle.
Step 11: Flip your paper over from left to right.
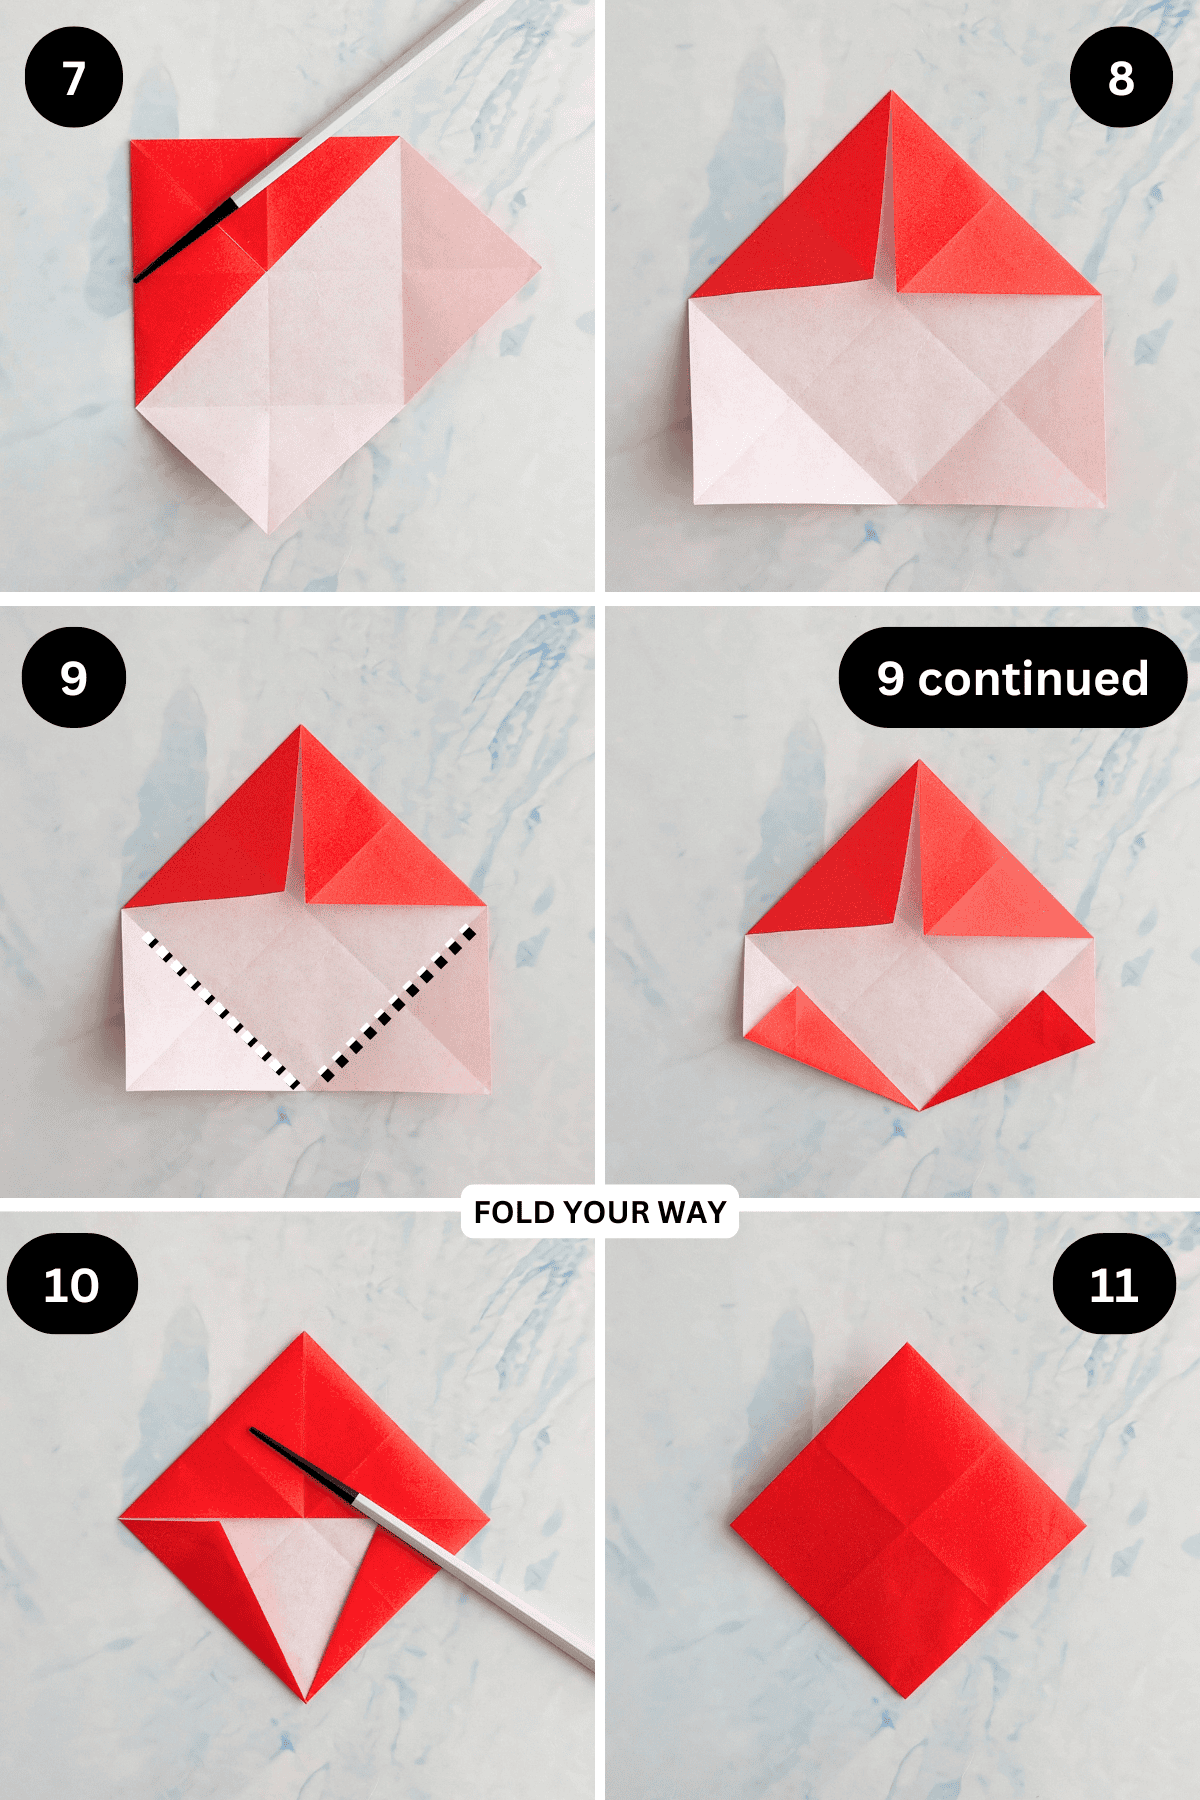
Step 12: Fold both the top left and top right edges in to meet the middle.
Step 13: Flip your paper over from left to right.
Step 14: Fold the bottom point up along the line shown.
Step 15: Unfold previous step.
Step 16: Fold the top point behind slightly.
Step 17: Open out your box, adjusting and re-creasing the edges as needed. Completed box. Decorate your box as you like.
Tips For Success
- Use origami paper with red on one side and white on the other for the classic Santa look.
- Draw simple eyes or beard details after folding for extra character.
- Fold crisply and carefully to keep the box shape neat and sturdy.
- For larger candies or treats, try using slightly bigger paper squares.
- Use patterned paper with holiday prints for a unique twist.
- Store the boxes flat before use—they fold flat for easy storage and transport.
Color, Paper Ideas, and Variations
- Traditional red and white origami paper for the classic Santa.
- Patterned holiday paper with snowflakes, stars, or candy canes.
- Metallic red or glitter paper for a festive shimmer effect.
- Kraft paper with painted or sticker accents for a rustic look.
- Mini versions using smaller paper squares for cupcake toppers or gift tags.
- Double-sided patterned paper with a holiday print on one side and solid color on the other.
FAQ
Yes, for small wrapped chocolates or candies. Avoid heavy or bulky items.
Yes, but cut it into a square first. Origami paper works best for crisp folds.
Absolutely. It’s simple enough for kids with some help on the folds.
Other Paper Crafts You Might Like To Try:
Stay Connected
Made this pattern? Let us know how it went in the comments below!
Pin this post - Pin now to take your paper crafting skills to the next level.
Share on Instagram or Facebook - Capture the beauty of your finished paper craft project and share it on Instagram or Facebook! Tag us @foldyourway so we can see your work!
Other Patterns You Might Like To Try:
Looking for other easy patterns like this? Try these:


Nathan Belwood says
Great content. I got value from. Appreciate it!