
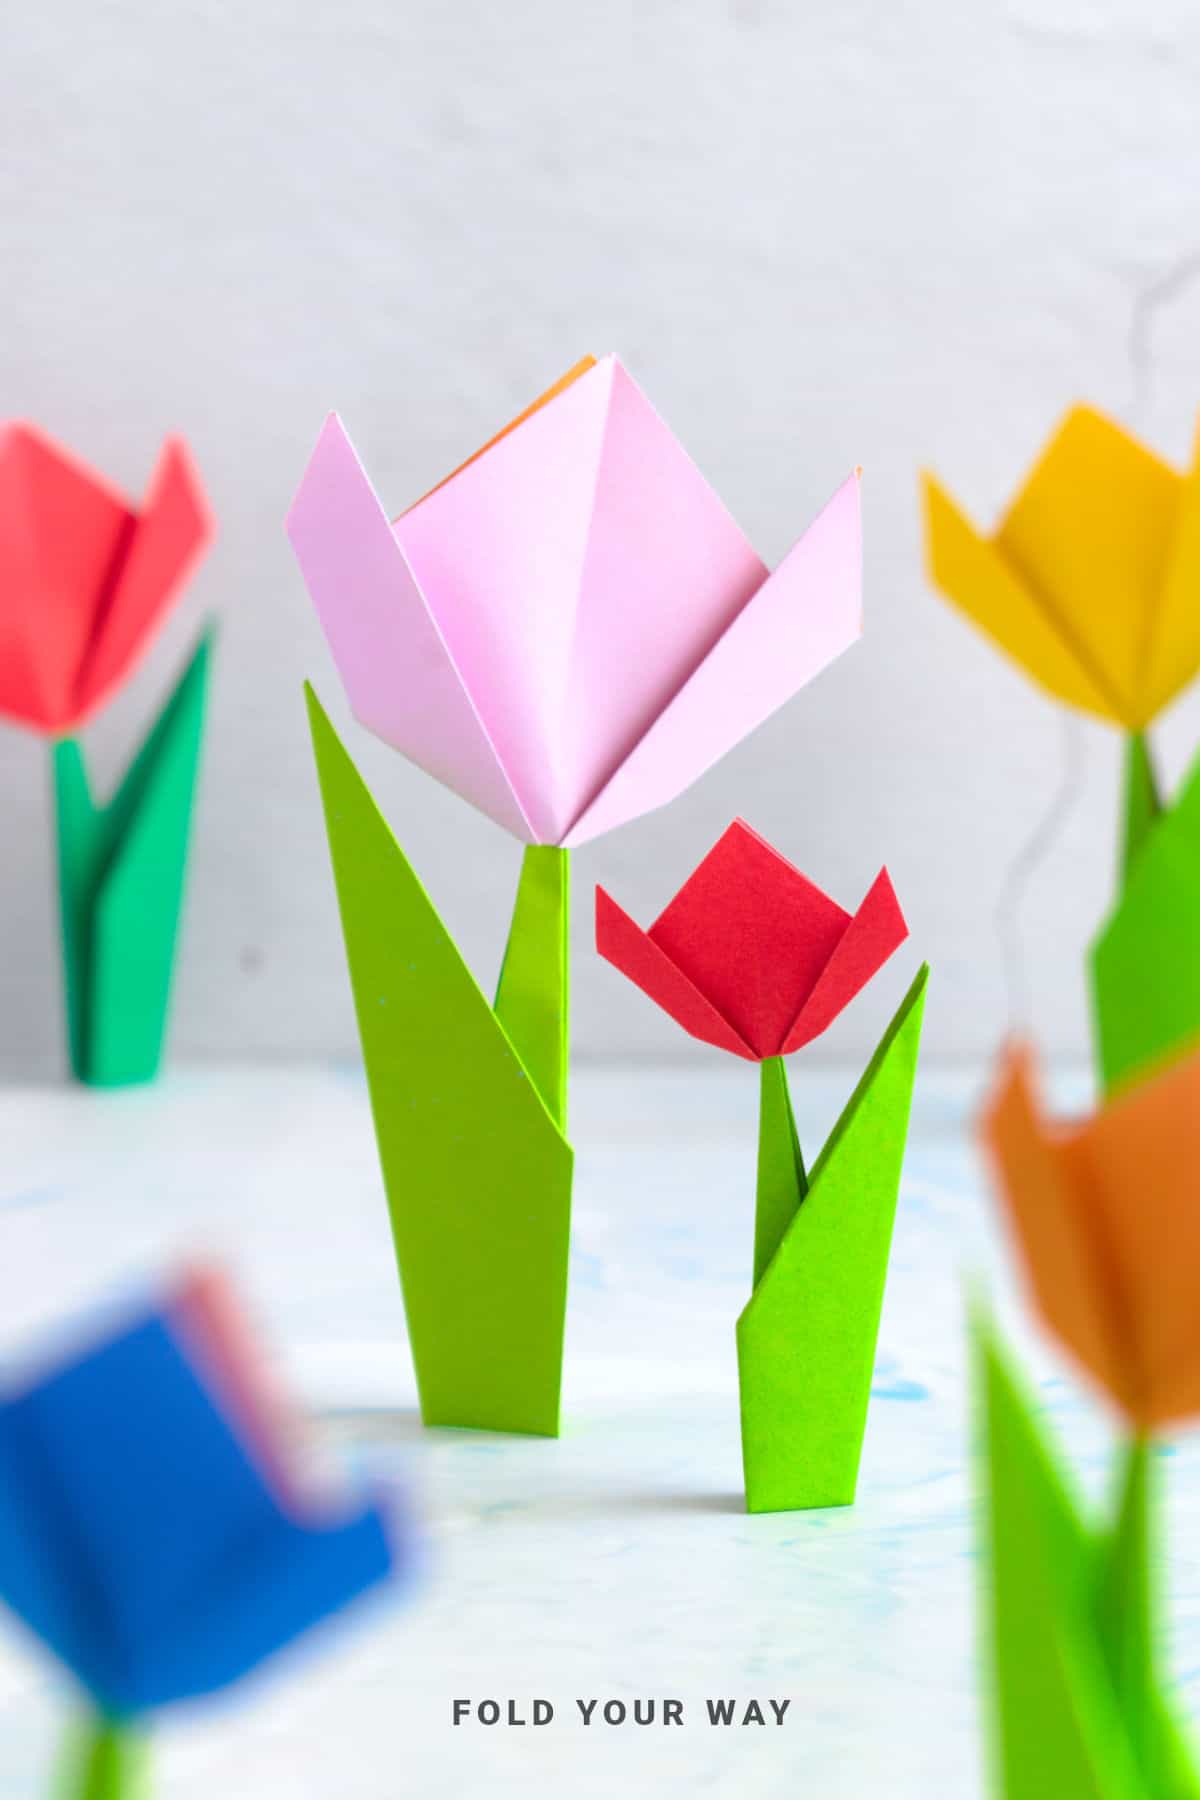
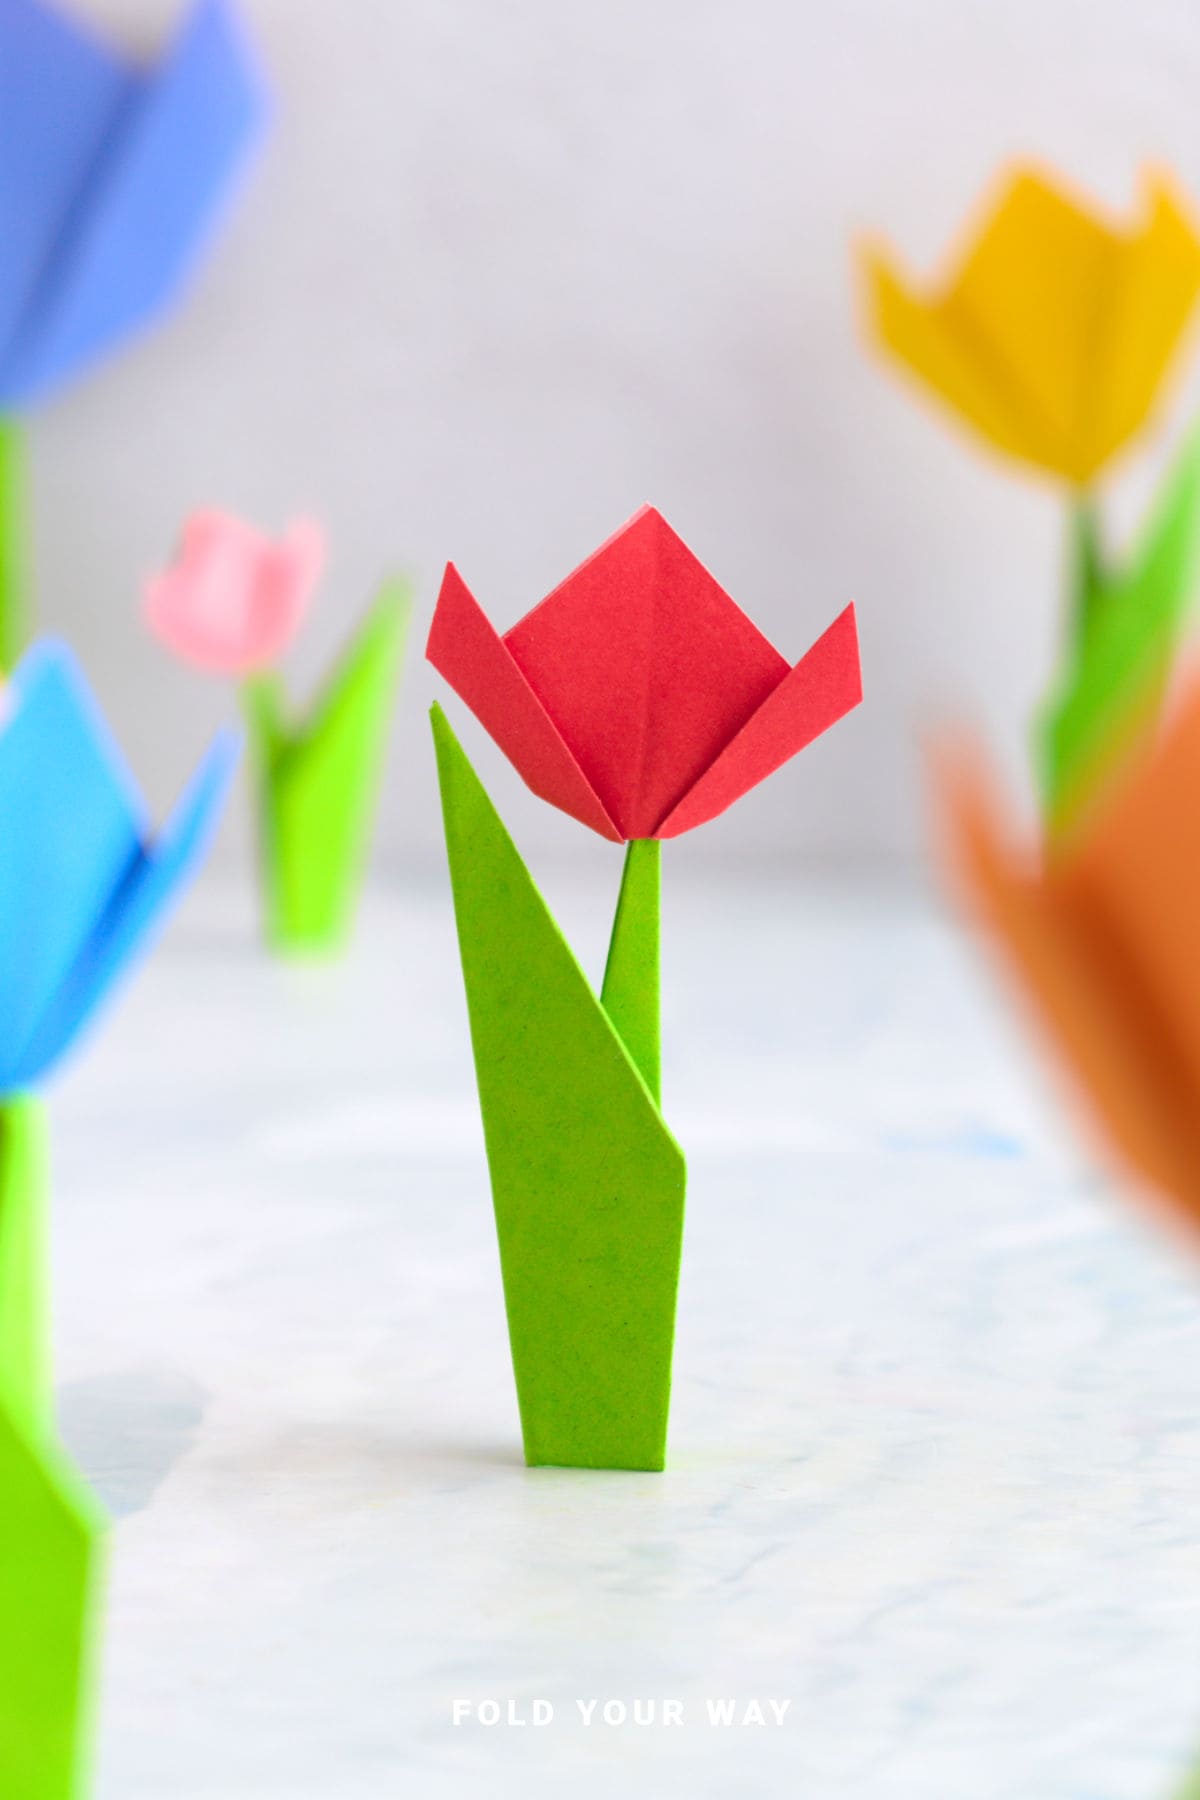
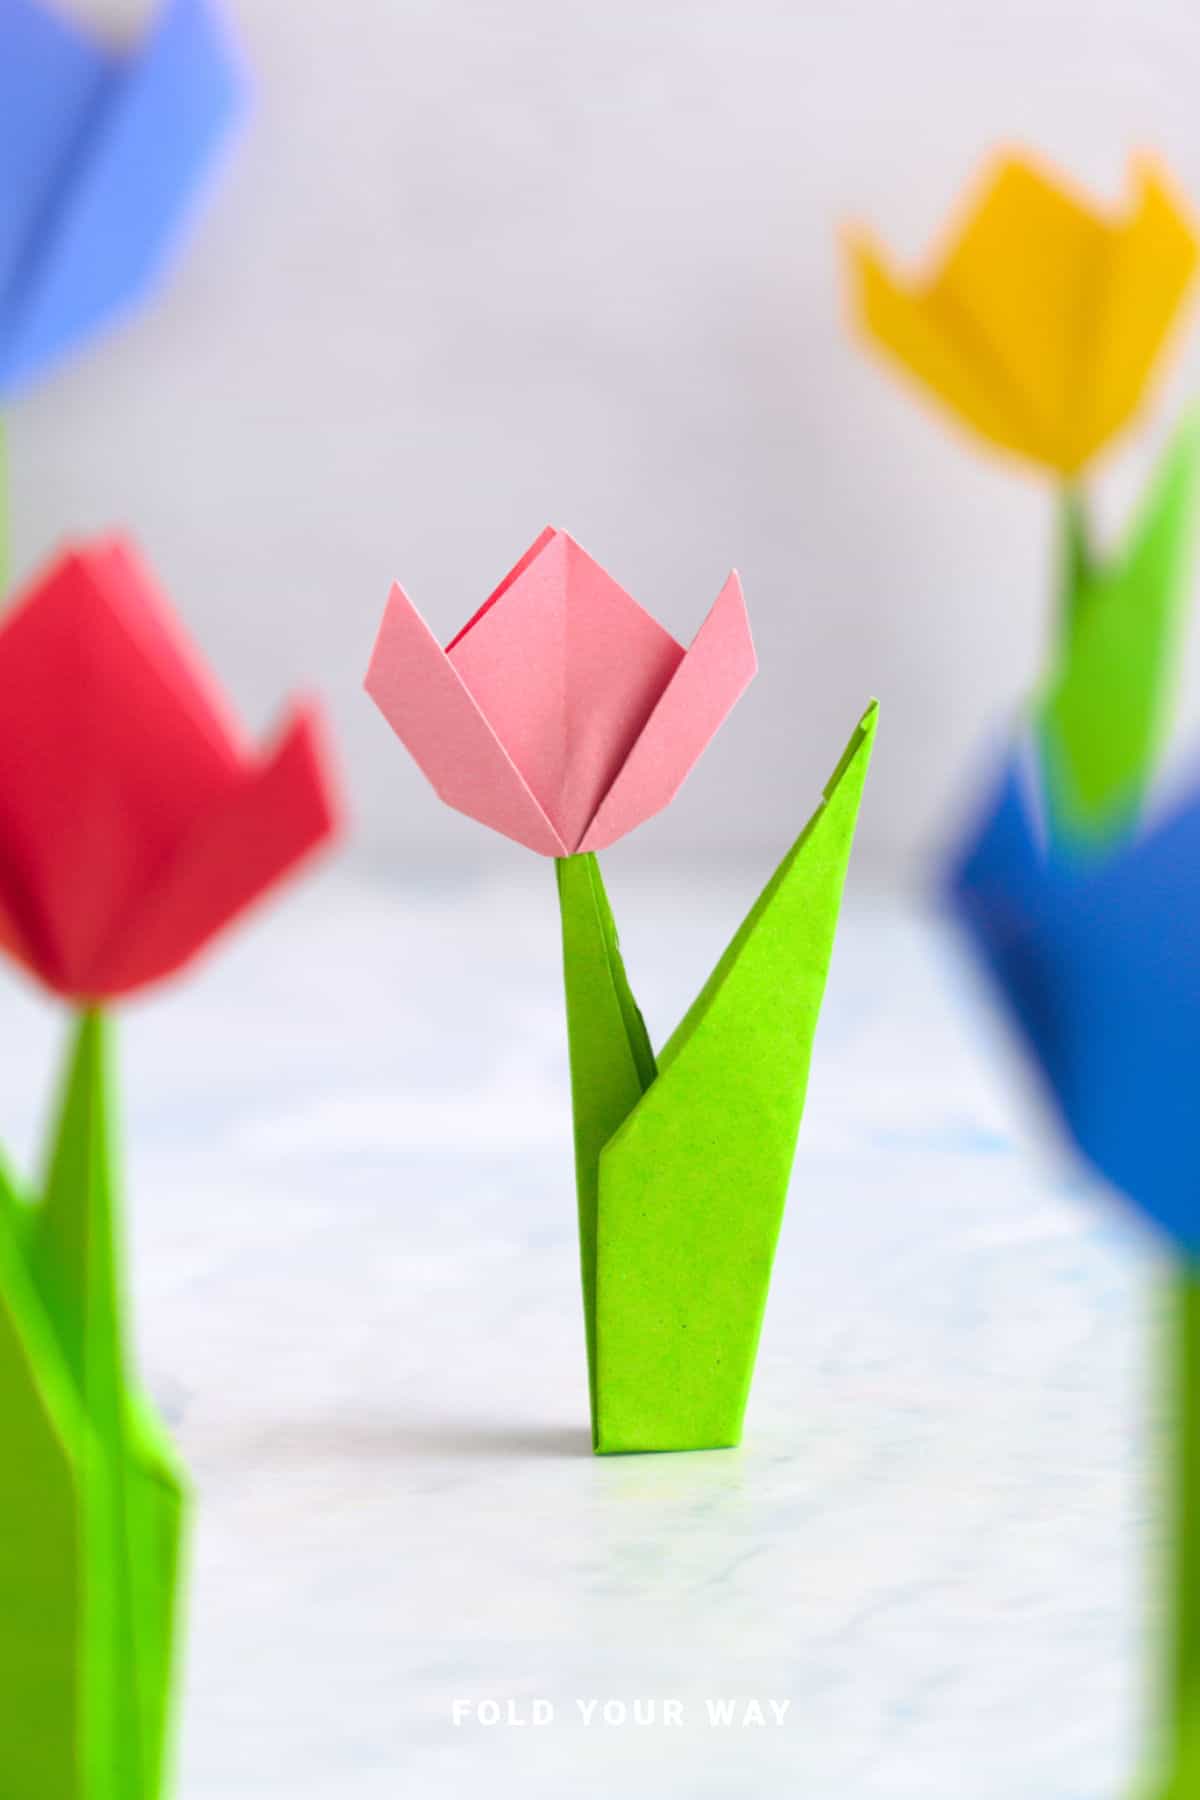
This charming 2D origami tulip is a quick and easy paper craft using just two sheets of paper.
Ideal for Mother’s Day, spring, or birthday cards, it’s a lovely way to bring color and creativity to your next DIY craft session.
Jump to:
Looking for a sweet and simple paper flower you can fold in minutes?
This flat 2D origami tulip with a stem is perfect for anyone wanting to add a personal touch to handmade cards, wall art, bookmarks, or table decorations.
Made with just two square sheets of paper—one green for the stem and one colorful or patterned for the flower head—it’s a beginner-friendly project that doesn’t sacrifice charm.
Because it folds flat, this tulip is ideal for crafting projects like spring garlands, Mother’s Day cards, teacher appreciation gifts, and even Valentine’s Day notes.
It also works beautifully for decorating Easter baskets, gift wrap, or journaling spreads. The tulip’s bold, clean shape makes it especially striking in bright colors or prints, but you can also keep it classic with soft pastels for a more traditional look.
This origami tutorial is suitable for both kids and adults and is a great way to explore simple floral folds without any complicated shaping or tricky steps.
All you need is a pair of square papers and a few minutes of folding time to bring these pretty paper tulips to life.
Why You'll Love This Pattern
- Folds completely flat – Perfect for cards, scrapbooks, garlands, or gift wrap.
- Beginner-friendly – A great introduction to origami flowers using basic folds.
- Great for any occasion – Try it for Mother’s Day, Easter, birthdays, or spring-themed parties.
- Uses only 2 sheets of paper – One for the tulip head, one for the stem.
- Easy to customize – Mix and match papers for different looks.
- Fun for all ages – A great DIY craft for kids, teens, and adults alike.
Skill Level
★☆☆☆☆ (Very Easy)
Materials Needed
- 1 square sheet of green paper (for the stem)
- 1 square sheet of colored or patterned paper (for the flower head)
- Scissors
- Optional: glue (if attaching to cards or making garlands)
| Paper Size (Stem) | Paper Size (Flower Head) | Final Flower Size | |
| Small Origami Tulip | 4 inches x 4 inches (10 cm x 10 cm) | 2 inches x 2 inches (5 cm x 5 cm) | 3.5 inches x 1 inch (9 cm x 3.5 cm) |
| Medium Origami Tulip | 6 inches x 6 inches (15 cm x 15 cm) | 4 inches x 4 inches (10 cm x 10 cm) | 6 inches x 3.5 inches (15.5 cm x 9 cm) |
| Large Origami Tulip | 8 inches x 8 inches (20 cm x 20 cm) | 6 inches x 6 inches (15 cm x 15 cm) | 8.5 inches x 4 inches (22 cm x 12 cm) |
Instructions
To Make The Flower Head
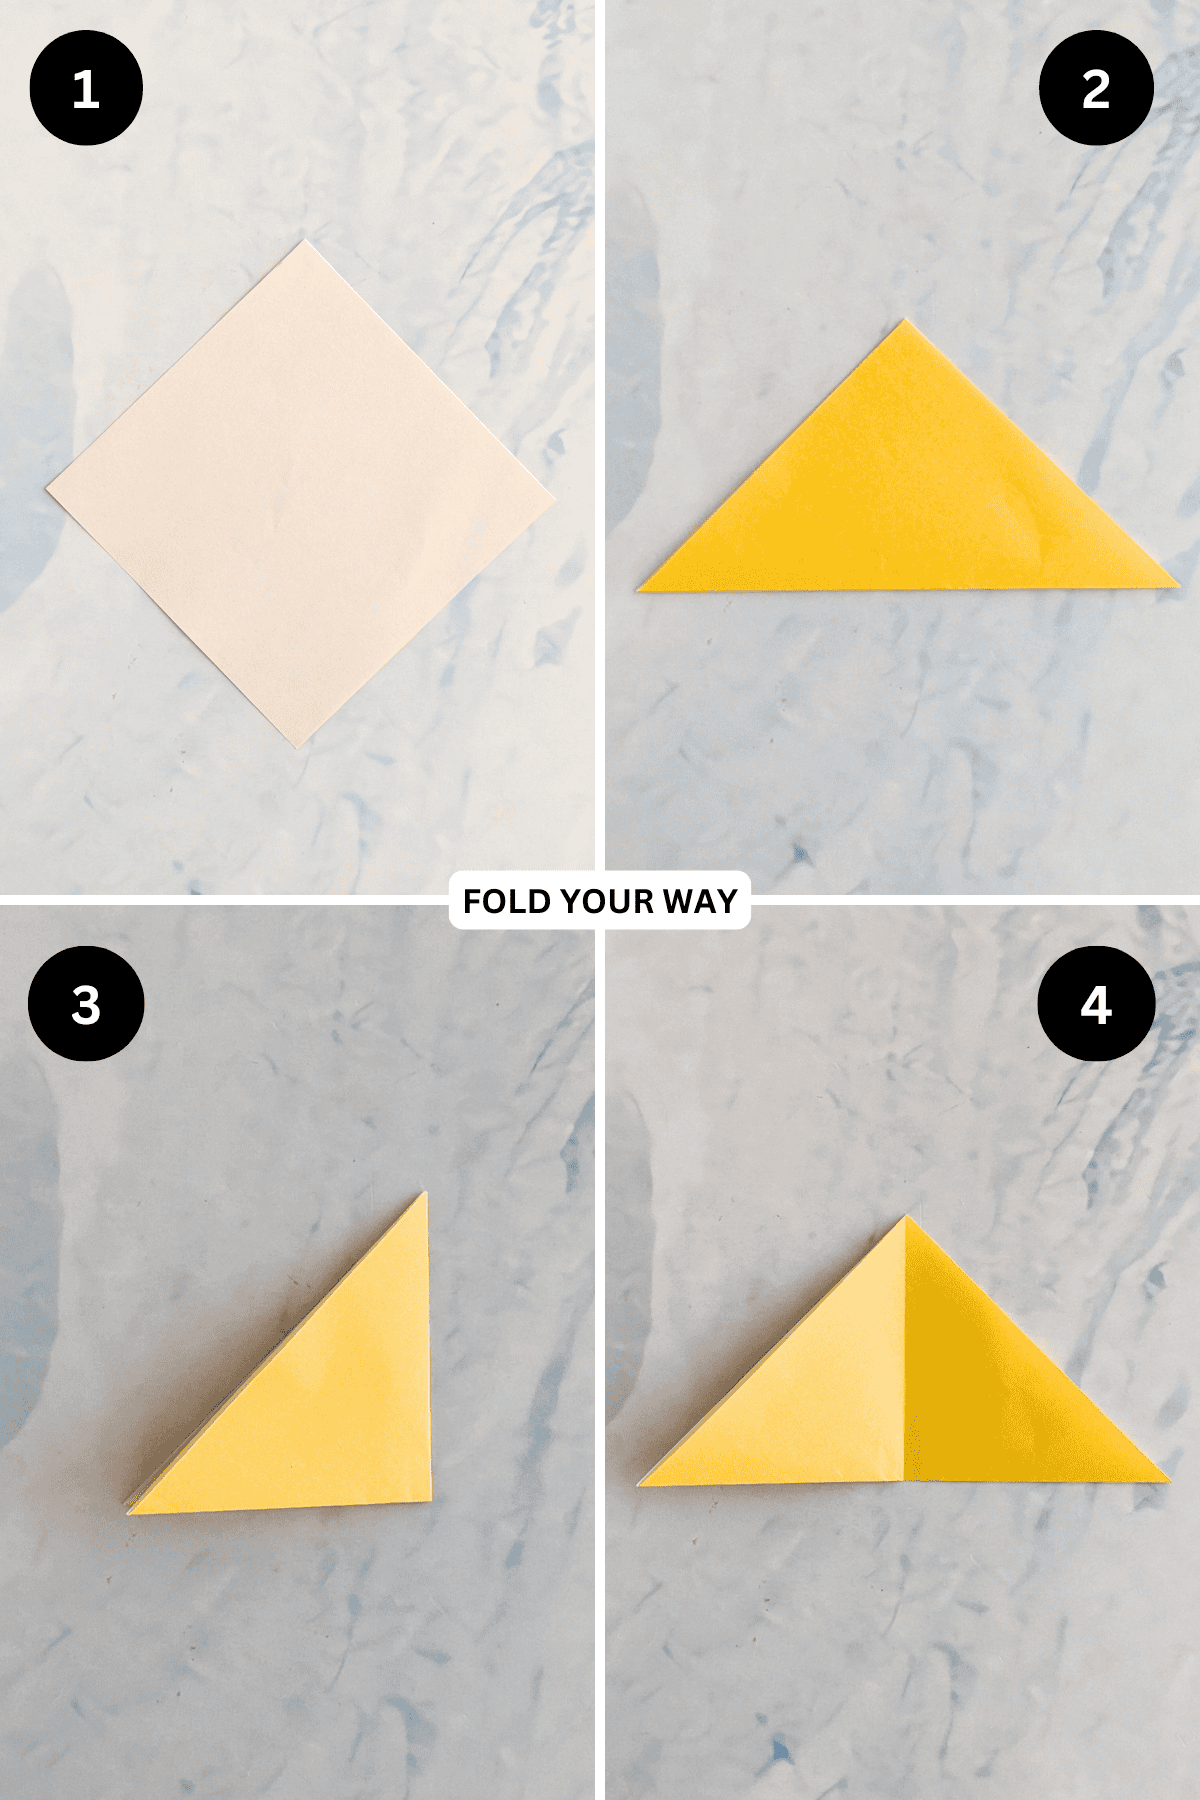
Using your colored paper.
Step 1: Arrange your paper to sit like a diamond shape and have the color you want your tulip head to be facing down.
Step 2: Fold the bottom point up to meet the top point.
Step 3: Fold the right point to meet the left point.
Step 4: Unfold previous step.
Step 5: Fold both the left and right points up along the lines shown.
Step 6: Flip your paper over from left to right.
Step 7: Fold both the bottom left and right corners in a little, keeping it as symmetrical as possible.

Step 8: Flip your paper over from left to right. Completed tulip head.

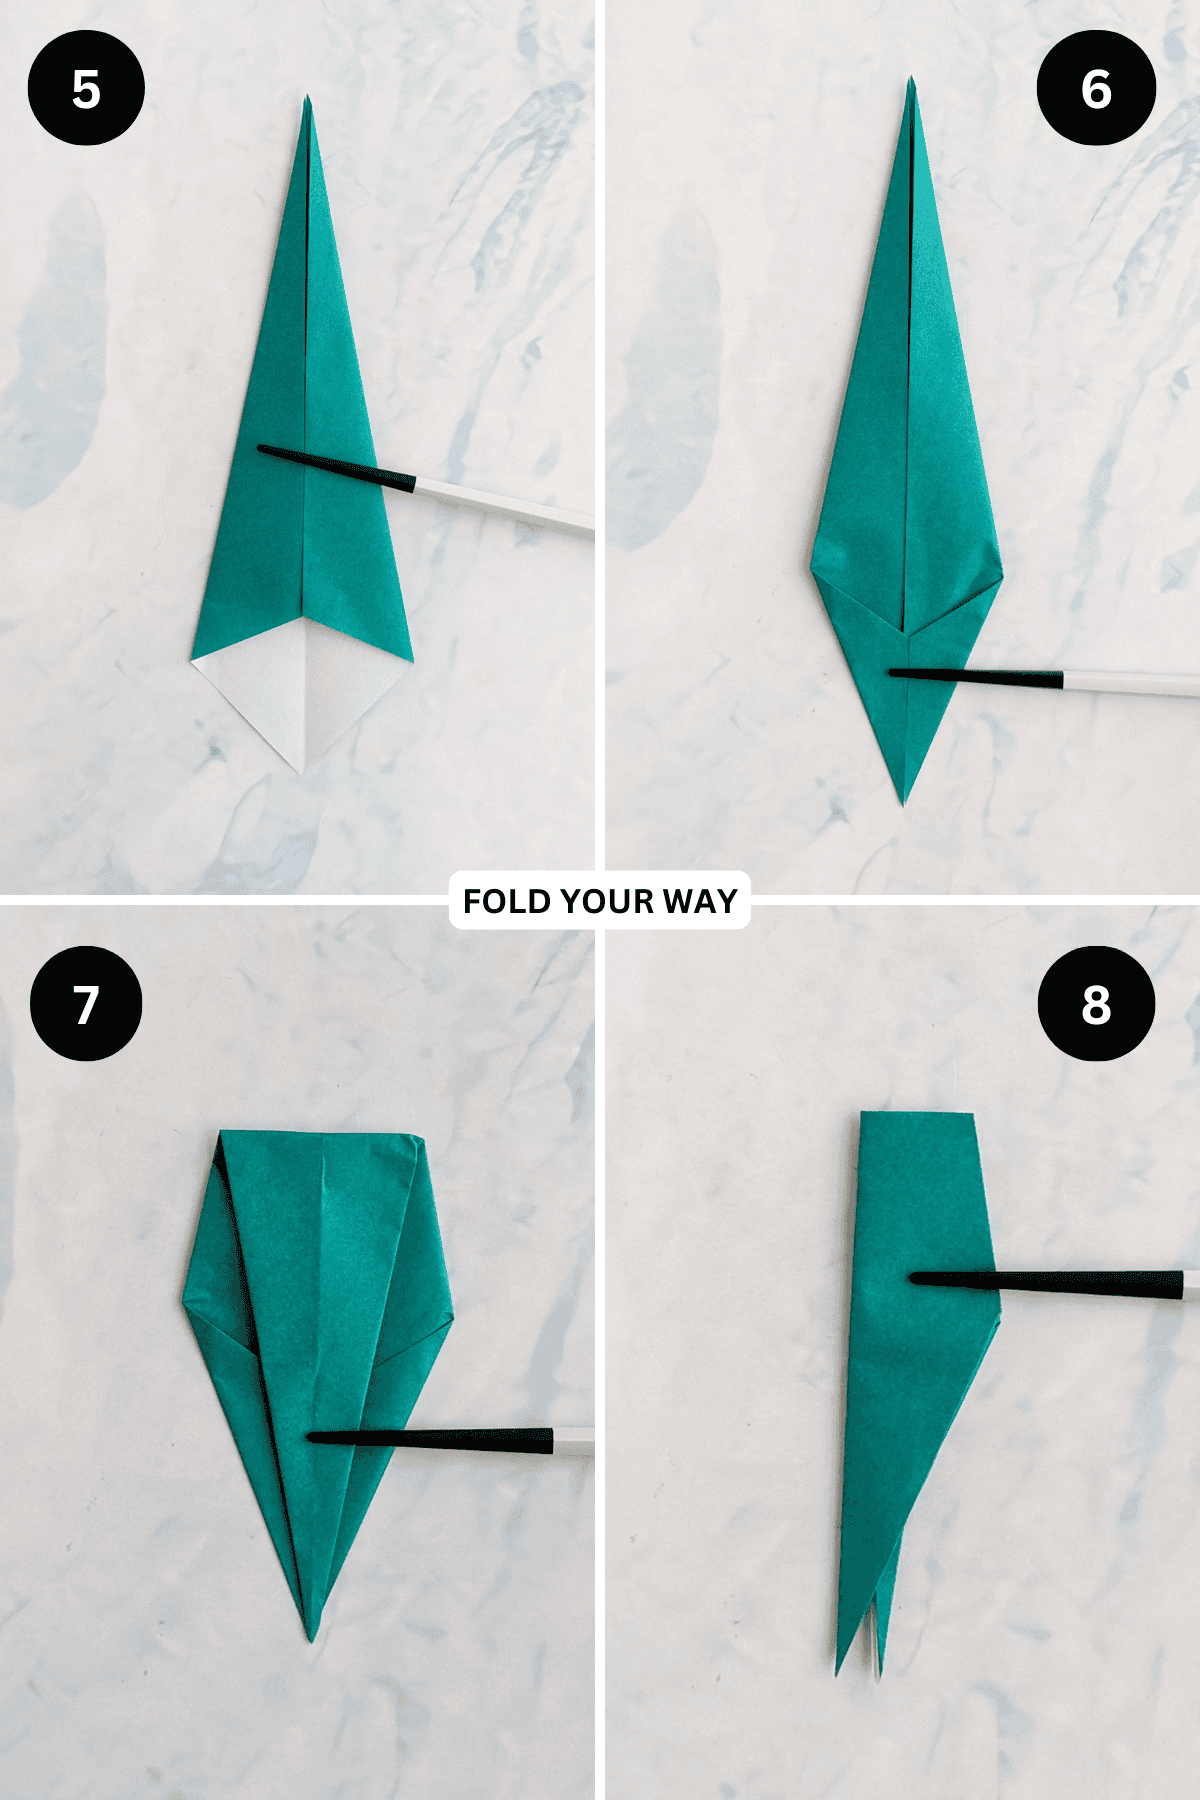
To Make the Stem
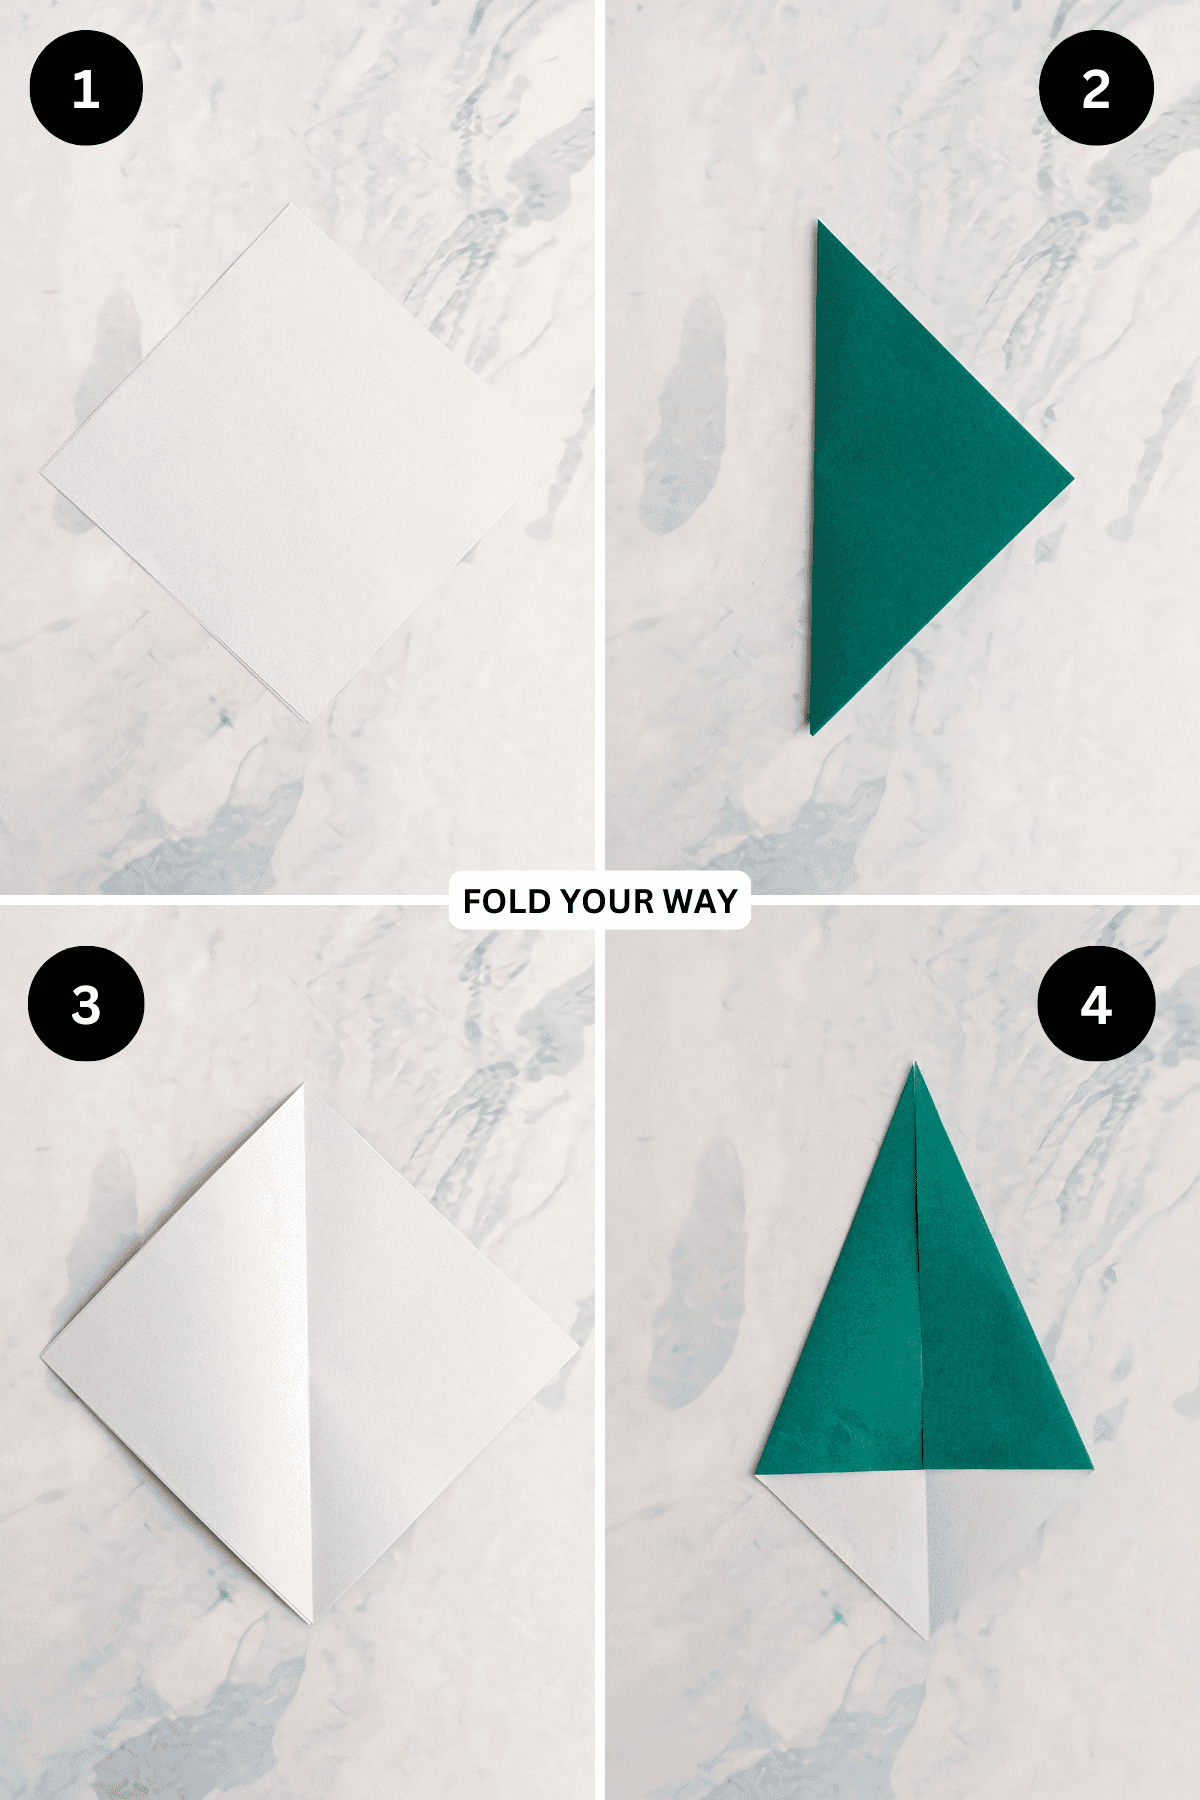
Using your green sheet of paper.
Step 1: Arrange your paper so it sits like a diamond and the stem color is facing down.
Step 2: Fold the left point to meet the right point.
Step 3: Unfold previous step.
Step 4: Fold both the upper left and upper right edges in to meet the middle crease.
Step 5: Once again, fold both the upper left and right edges in to meet the middle crease.
Step 6: Fold the bottom left and right edges in to meet the middle crease.
Step 7: Fold the top point down to meet the bottom point.
Step 8: Fold the paper in half from left to right.
✨ You're almost there! ✨
To unlock the final steps and complete your pattern, create a free account with Grow.me. below.
Make sure you tick the box to subscribe to our newsletter and stay up to date with the latest patterns, tips, and more!
Once you're signed up, you'll get instant access to finish your project and enjoy exclusive content in the future.
Already signed up? Hit the button below and select ‘Switch to Log In’ to pick up where you left off and finish your project!
Step 9: Rotate your paper 180 degrees.
Step 10: Gently pull the top two corners apart. Completed stem.

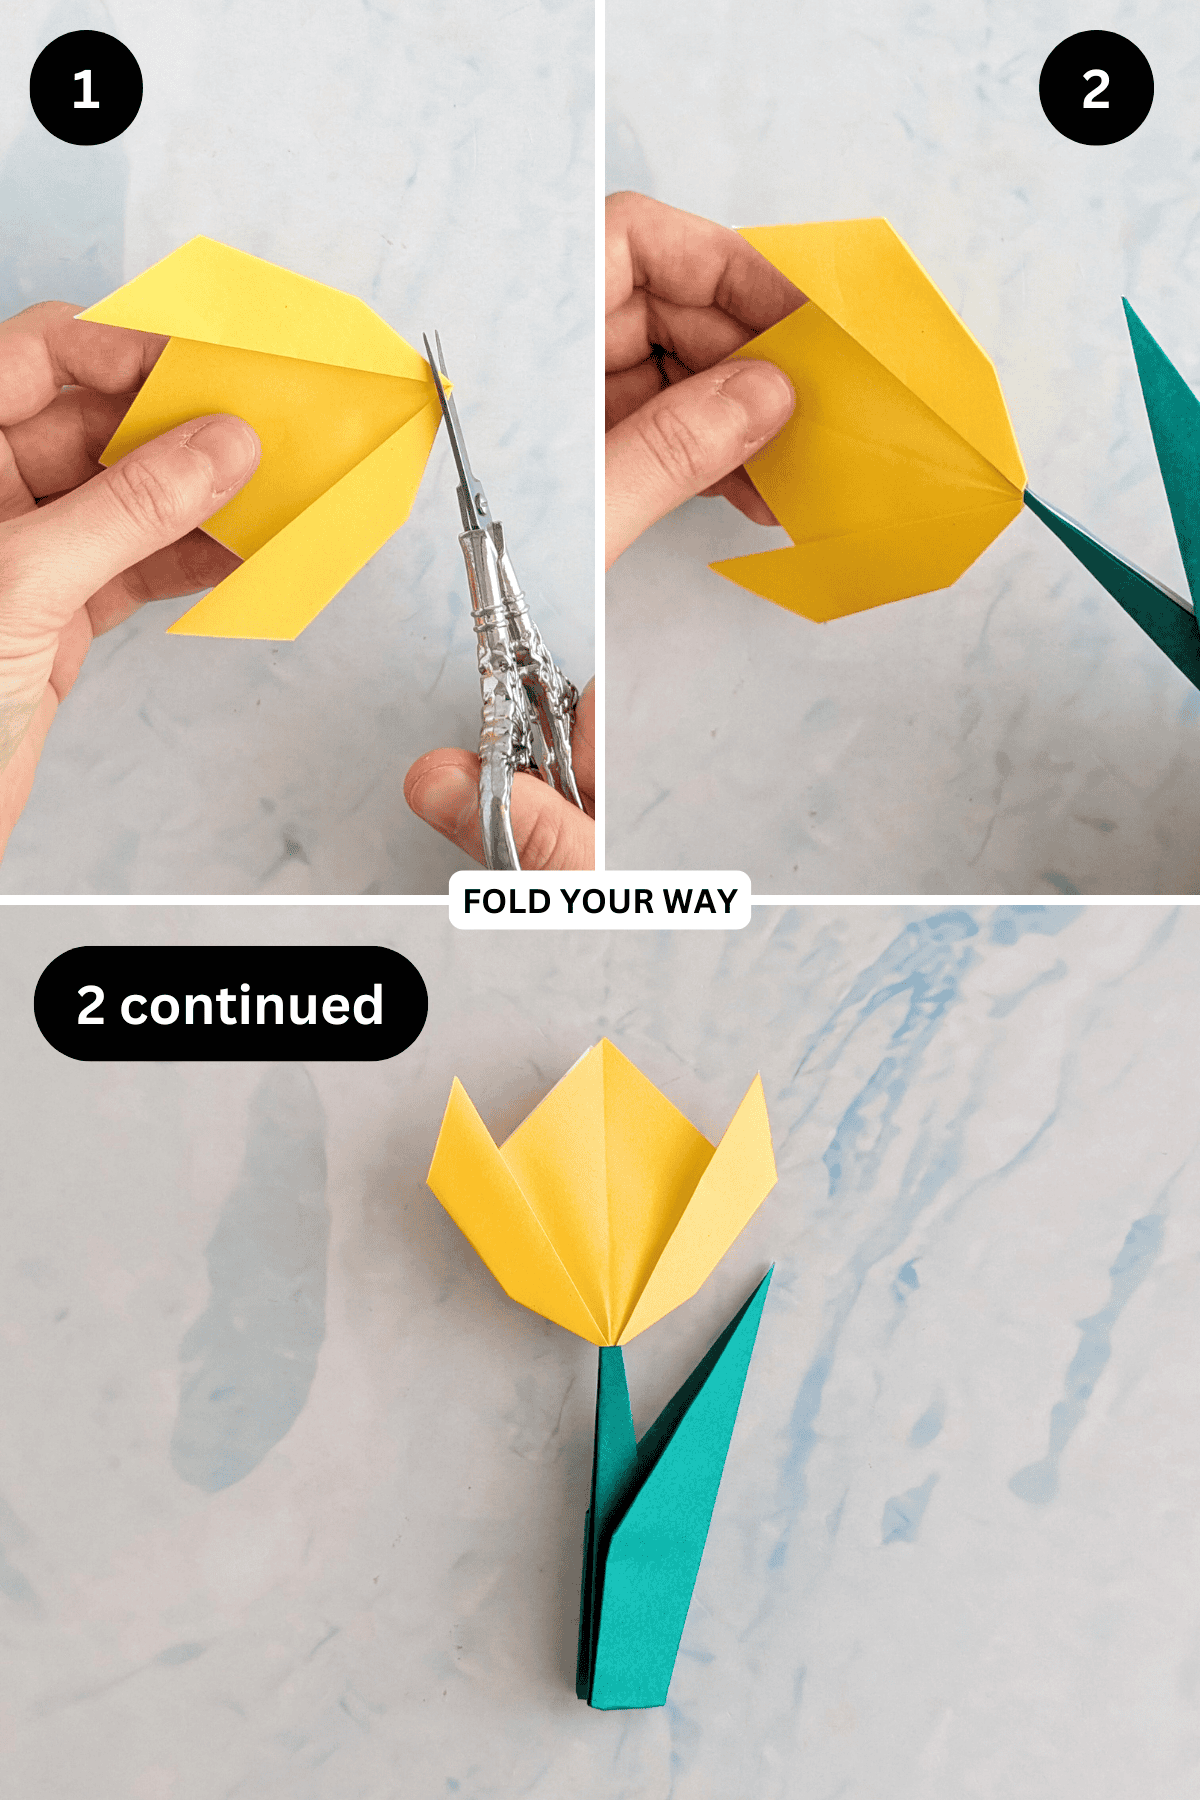
Putting The Origami Tulip Flower Together
Step 1: Cut a small part off the bottom of your tulip head. This will be where you insert your stem.
Step 2: Insert the thin upper part of the stem into the bottom of the flower (where you just cut it in the previous step). You will need to open out your tulip head slightly. Completed origami tulip with stem.
Tips For Success
- Use contrasting colors – Bright or patterned paper makes the flower pop.
- Mix flower sizes – Make a bouquet of different sized tulips.
- Secure for displays – Add a drop of glue if you're attaching to a card or surface.
- Try recycled paper – Magazine pages or old calendar sheets can give a unique look.

Common Mistakes & How To Avoid Them
- Paper too thick – Stick to lightweight paper for easy folding and a clean finish.
- Uneven flower points – Line up corners carefully to get a symmetrical shape.
- Folds not sharp enough – Use a ruler or fingernail to press down folds neatly.
Color, Paper Ideas, and Variations
- Spring pastels – Soft pinks, yellows, and lavenders are lovely for Easter or spring crafts.
- Bold & bright – Try red, orange, or hot pink for standout tulips.
- Patterned paper – Florals, polka dots, or stripes add personality to your tulips.
- Themed color combos – Use red & white for Valentine’s Day, or pastels for Mother’s Day cards.
- Make a bouquet – Attach several tulips to green paper straws or skewers for a 3D effect.
FAQ
Try it on greeting cards, in scrapbooks, gift tags, garlands, or as part of a handmade bouquet.
Absolutely! It’s a great easy craft idea for kids with minimal help.
Other Crafts You Might Like To Try:
Stay Connected
Made this pattern? Let us know how it went in the comments below!
Pin this post - Pin now to take your paper crafting skills to the next level.
Share on Instagram or Facebook - Capture the beauty of your finished paper craft project and share it on Instagram or Facebook! Tag us @foldyourway so we can see your work!
Other Patterns You Might Like To Try:
Looking for other easy patterns like this? Try these:


Comments
No Comments