
Create a stunning origami poinsettia that adds festive charm to your holiday décor.
Using just four sheets of red or colored paper and one sheet of green, this paper craft is perfect for Christmas cards, gift wrapping accents, table scatter, wreath embellishments, or even hanging ornaments and garlands.
Jump to:
- Why You'll Love This Pattern
- Skill Level
- Materials Needed
- Instructions
- Tips For Success
- Common Mistakes & How To Avoid Them
- Color, Paper Ideas, and Variations
- FAQ
- Other Paper Crafts You Might Like To Try:
- Helpful Tips and Common Mistakes For Paper Crafts
- Stay Connected
- Other Patterns You Might Like To Try:
- Comments
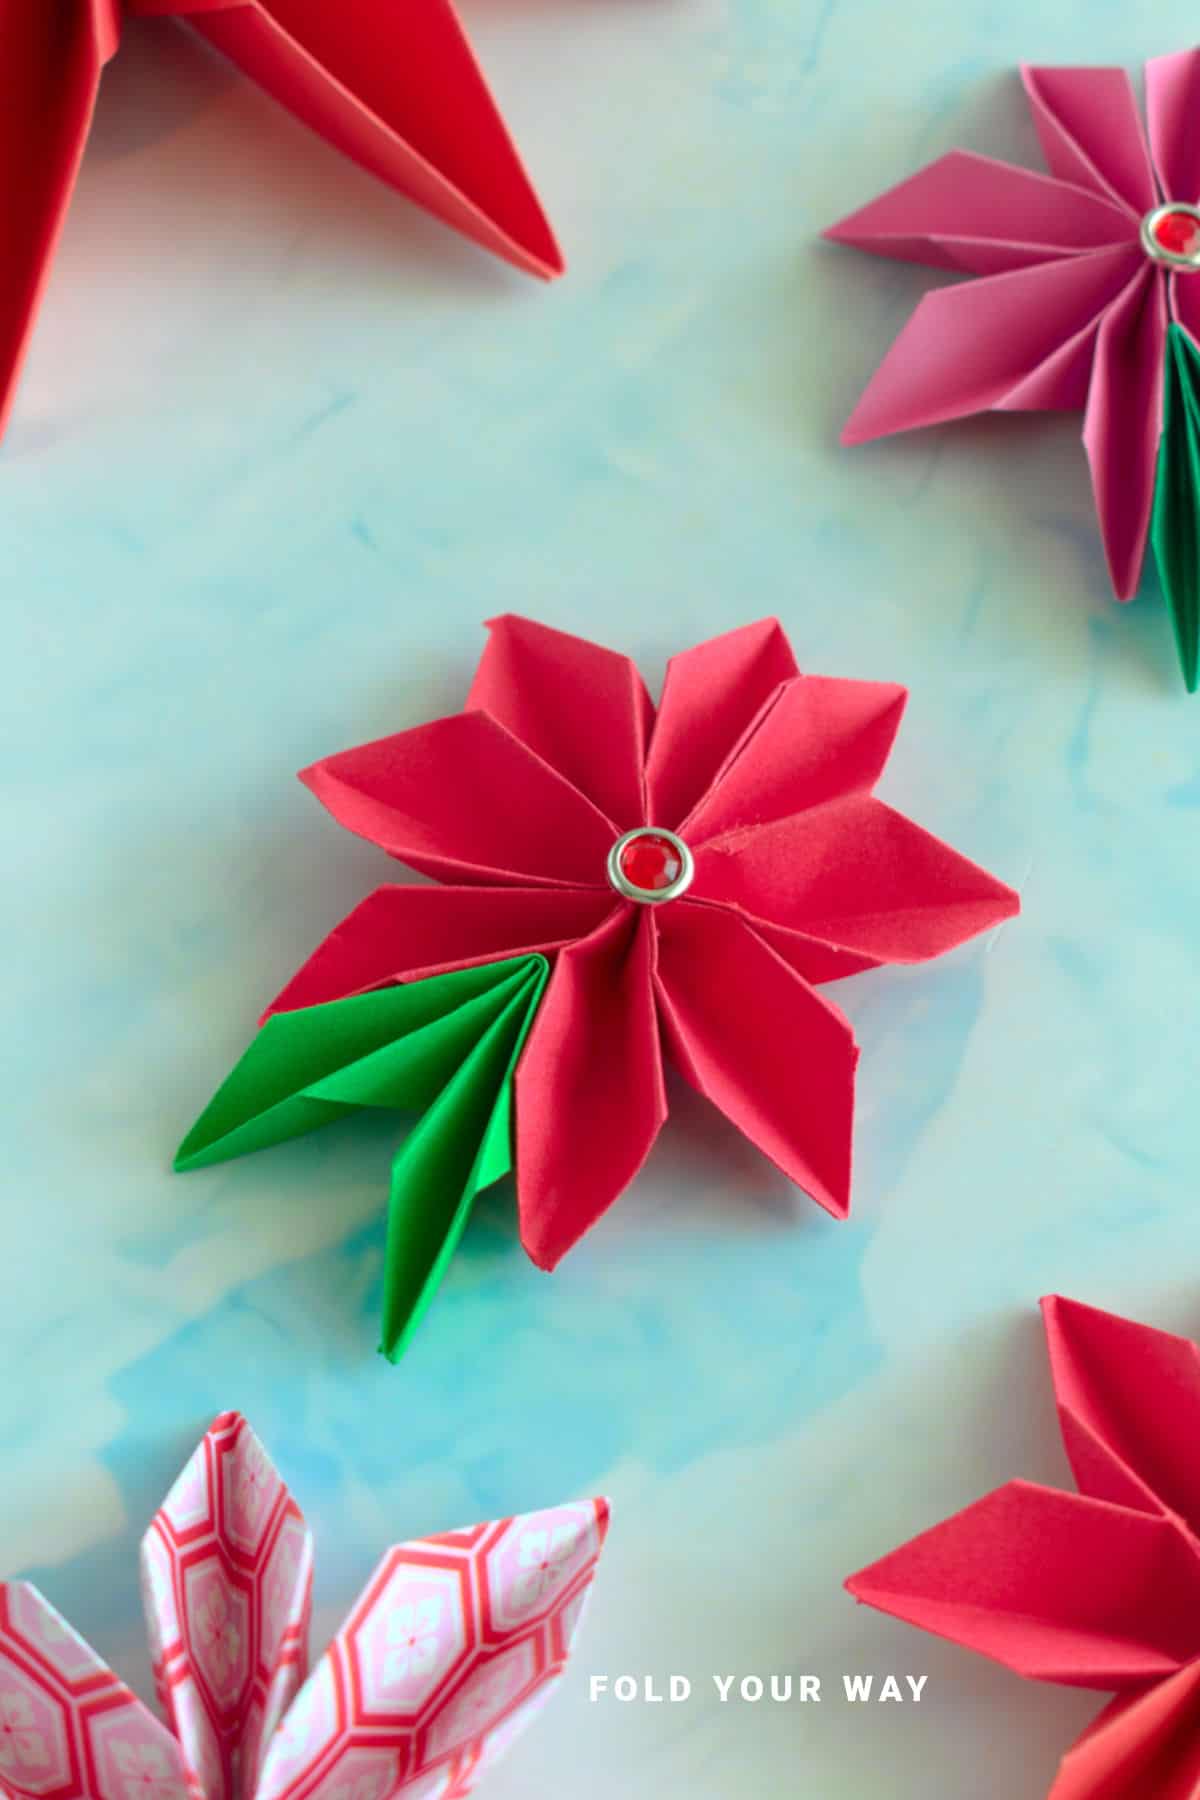
This origami poinsettia is a beautiful paper craft that captures the spirit of the holiday season with vibrant reds and fresh greens.
Perfect for Christmas décor, this project lets you fold a delicate flower using a total of six sheets of paper — four red or colored and two green.
With an optional bead center, your finished poinsettia looks even more authentic and eye-catching.
Whether you want to embellish holiday cards, decorate wrapped presents, scatter blooms across your table, or create wreaths and garlands, this origami tutorial provides clear step by step instructions that are accessible for all skill levels.
This paper craft is especially suited for Christmas, but the poinsettia’s classic design also works well for Winter celebrations or anytime you want to add a festive floral touch.
The size guide ensures your pieces fit together perfectly, making folding easier and the final result more polished.
If you enjoy following origami tutorials or want a seasonal craft project that feels both traditional and creative, this origami poinsettia fits the bill.
Adding a loop to hang your poinsettia transforms it into a charming ornament or garland, giving you plenty of ways to decorate your home or give handmade gifts during the holidays.
Why You'll Love This Pattern
- Creates a beautiful, festive poinsettia perfect for Christmas décor
- Uses simple materials: just paper, glue, and optional bead
- Versatile for cards, gift wrap, table decorations, wreaths, ornaments, and garlands
- Step by step origami tutorial suitable for beginners and experienced crafters
- Adds a handmade, elegant touch to holiday celebrations
Skill Level
★☆☆☆☆ (Easy)
Materials Needed
- 4 sheets red or colored origami
- 1 sheets green origami (same size as red)
- Craft glue
- Optional bead or small button for the flower center
| Colored Paper Size 4 sheets needed | Green Paper Size 1 sheet needed | Final Poinsettia Size (approx.) | |
| Small Origami Poinsettia | 2 inches x 3 inches (5 cm x 7 cm) | 2 inches x 3 inches (5 cm x 7 cm) | 3 inches x 3 inches (7.5 cm x 7.5 cm) |
| Medium Origami Poinsettia | 3 inches x 4 inches (7 cm x 10 cm) | 3 inches x 4 inches (7 cm x 10 cm) | 4.5 inches x 4.5 inches (12 cm x 12 cm) |
| Large Origami Poinsettia | 5 inches x 6 inches (12 cm x 15 cm) | 5 inches x 6 inches (12 cm x 15 cm) | 7 inches x 7 inches (16 cm x 16 cm) |
You will need 5 sheets of paper in total – 4 colored (e.g. red) and 1 green.
Instructions
Using your colored (red) paper.
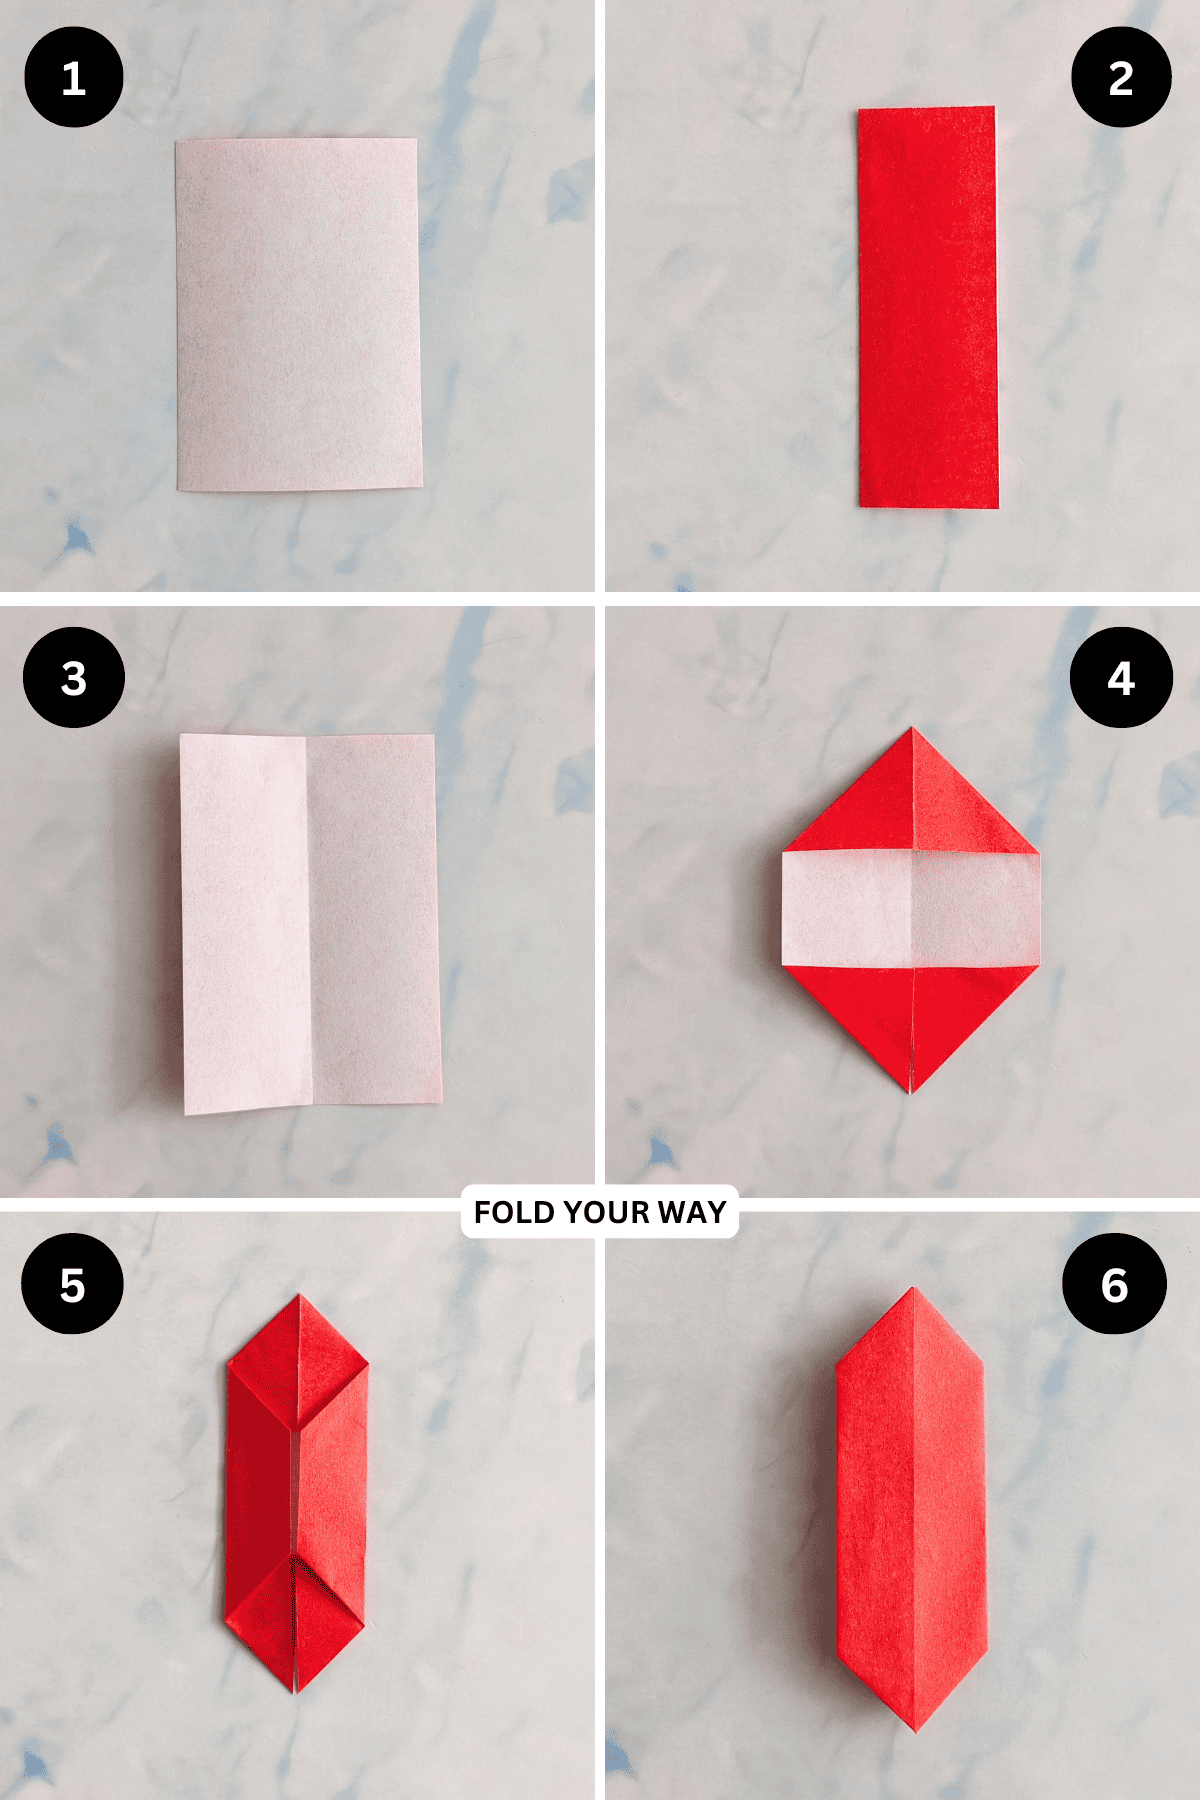
Step 1: Start with the color you want your poinsettia to be facing down. Arrange the paper to sit vertically.
Step 2: Fold the left edge to meet the right edge.
Step 3: Unfold previous step.
Step 4: Fold all four corners in to meet the middle crease.
Step 5: Fold both the left and right edges in to meet the middle crease.
Step 6: Flip your paper over from left to right.
✨ You're almost there! ✨
To unlock the final steps and complete your pattern, create a free account with Grow.me. below.
Make sure you tick the box to subscribe to our newsletter and stay up to date with the latest patterns, tips, and more!
Once you're signed up, you'll get instant access to finish your project and enjoy exclusive content in the future.
Already signed up? Hit the button below and select ‘Switch to Log In’ to pick up where you left off and finish your project!
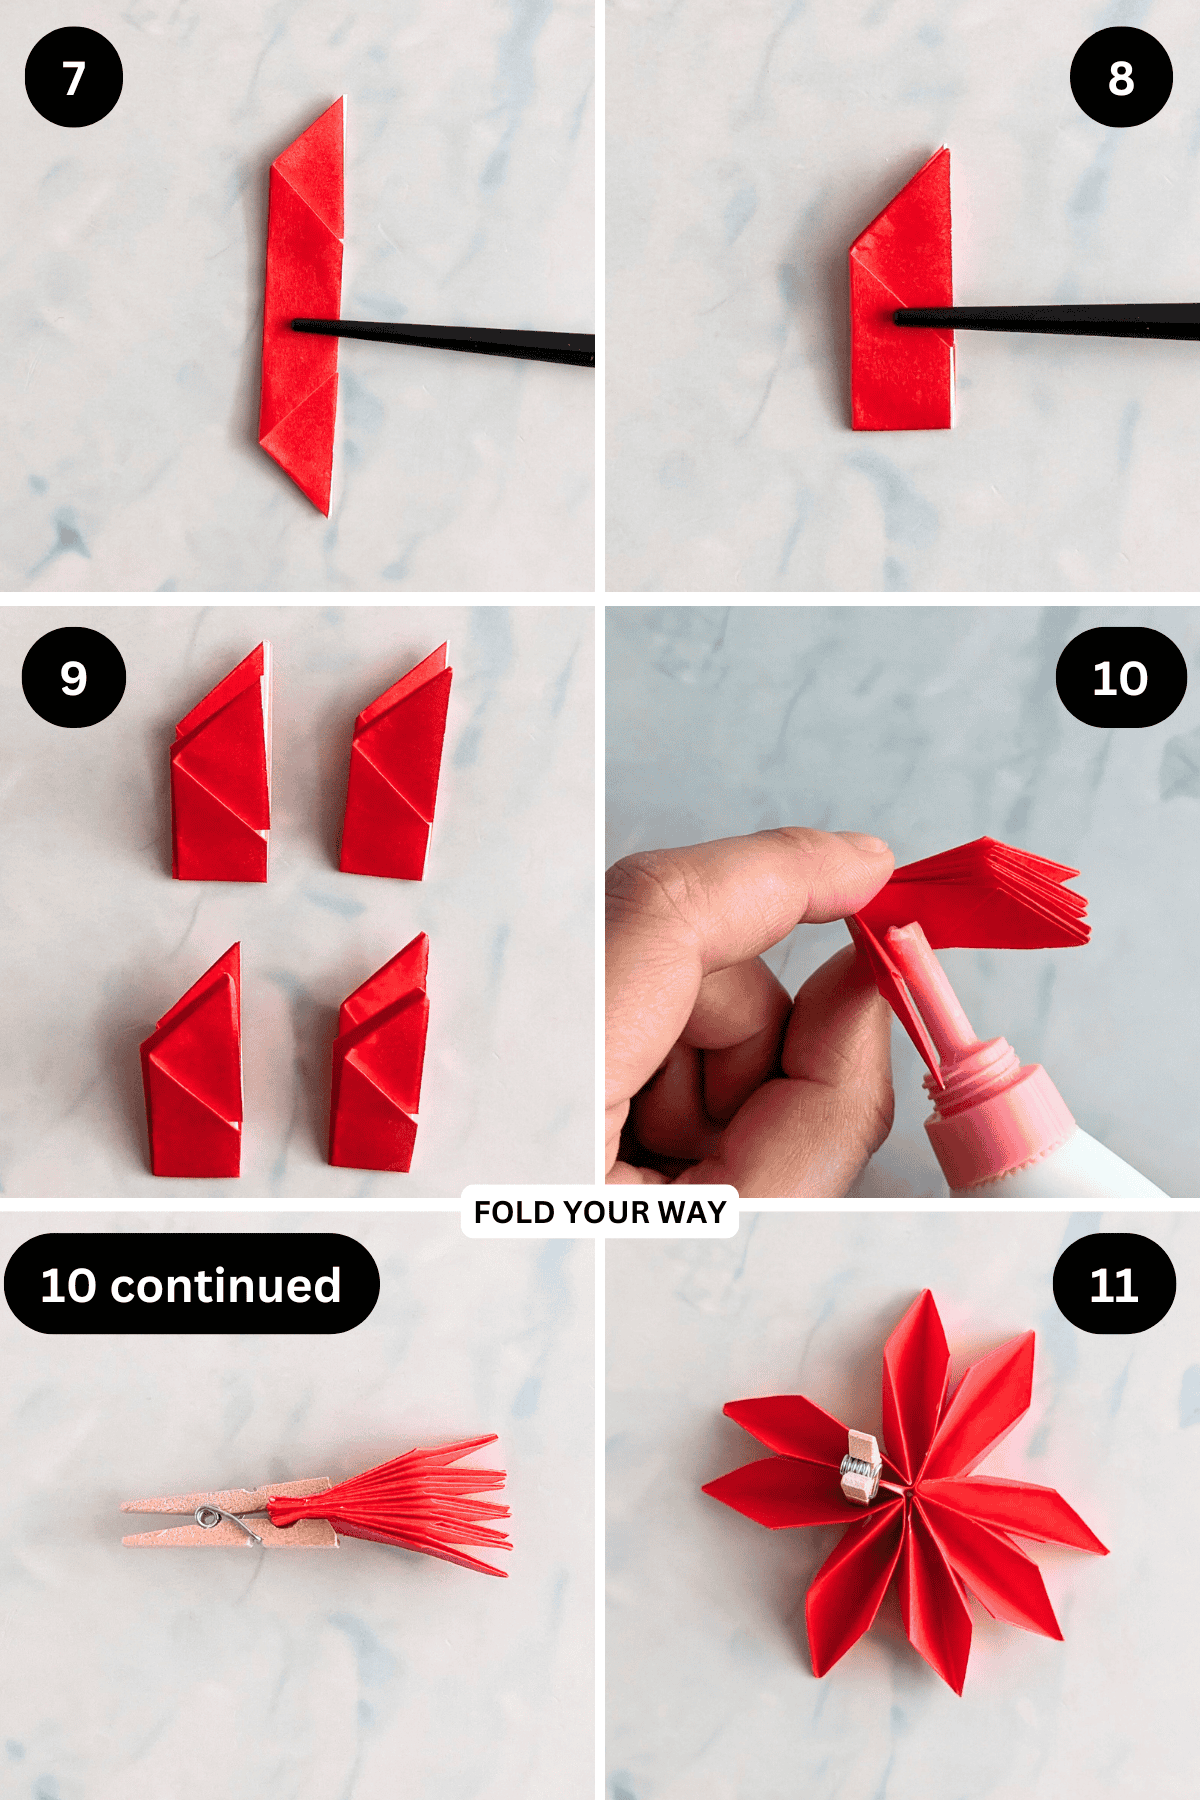
Step 7: Fold your paper in half from right to left.
Step 8: Fold the bottom point up to meet the top point.
Step 9: Repeat steps 1 to 8 for the remaining 3 sheets of colored paper.
Step 10: Apply some glue on the outer and inner edges of the folded pieces (on the folded end). Then, join the folded pieces on each side. Allow the glue to dry completely.
Step 11: Join the open ends together, applying some glue to the first and last pieces.
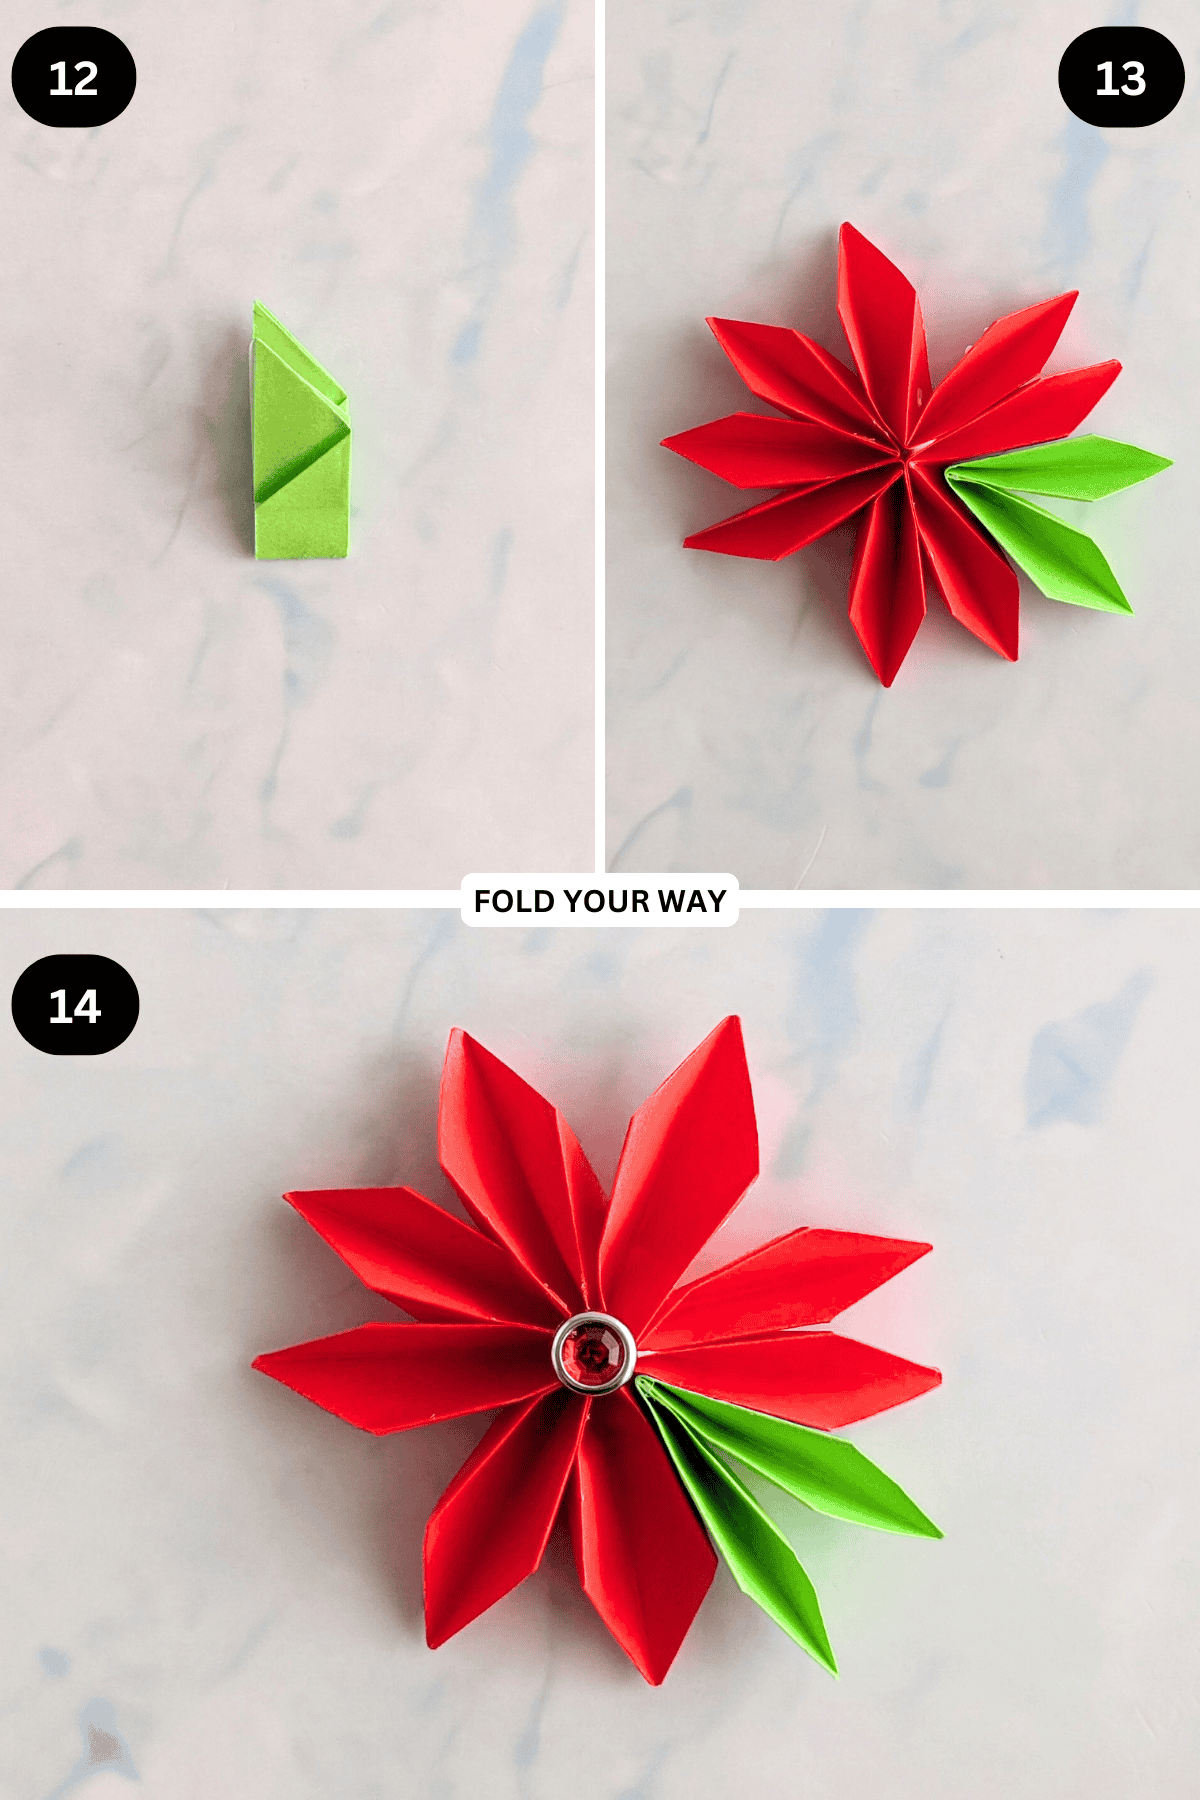
Step 12: Using your green paper, repeat steps 1 to 8.
Step 13: Glue the folded green piece in between one of the red petals.
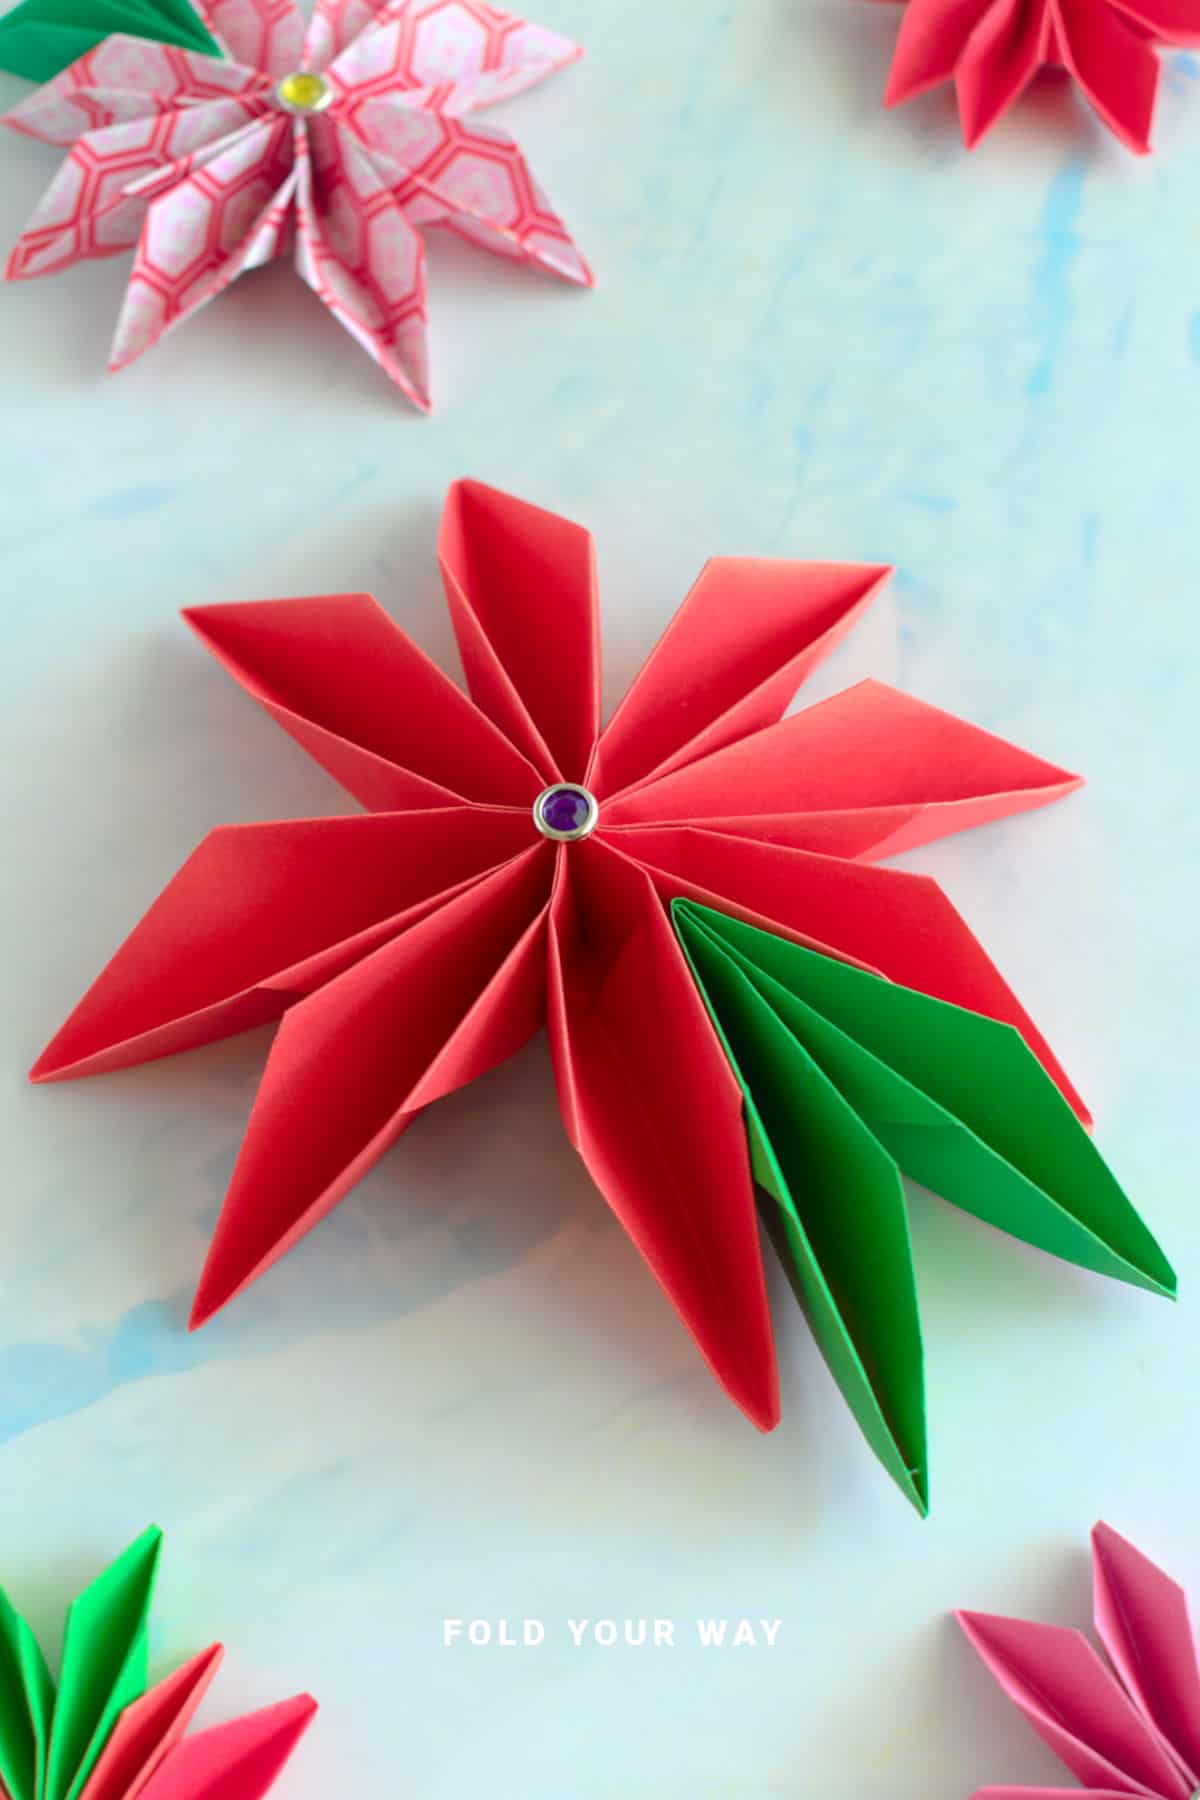
Step 14: Completed poinsettia. Decorate as you like.
Tips For Success
- Use quality origami paper for crisp folds and clean edges.
- Be patient when assembling petals—allow glue to dry between layers for best hold.
- Experiment with different red shades or metallic paper for variety.
- Adding a small bead or button to the center adds a nice finishing touch
- Use green leaves folded slightly curved for a more natural look.
- Attach a loop of string or ribbon to turn your poinsettia into an ornament or garland piece.
Common Mistakes & How To Avoid Them
- Petals not symmetrical: Use a ruler or template to cut your squares evenly before folding.
- Glue showing or smudging: Apply glue sparingly and wait to dry fully before handling.
Color, Paper Ideas, and Variations
- Classic poinsettia red petals with deep green leaves for traditional Christmas décor.
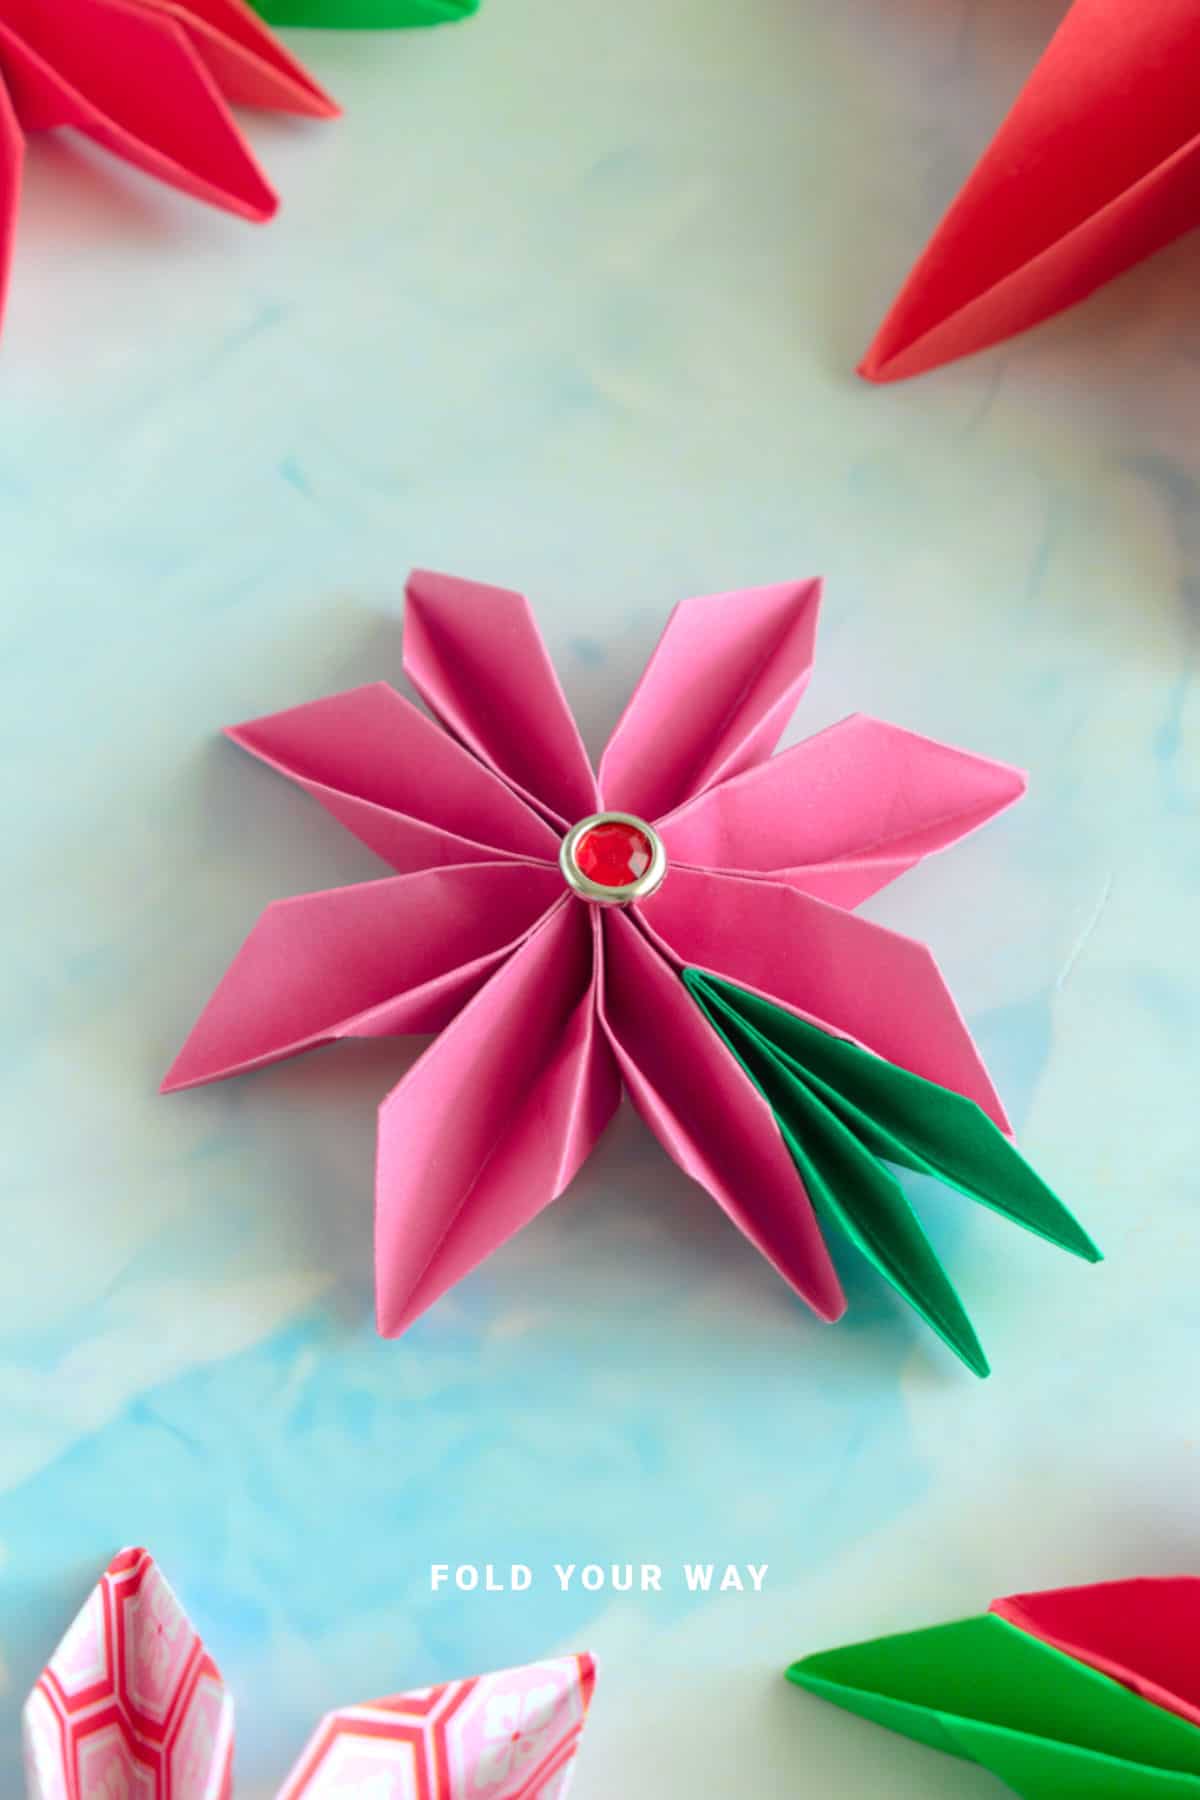
- Use burgundy, pink, or white paper for elegant or modern holiday styles.
- Metallic gold or silver petals for a sparkling festive effect.
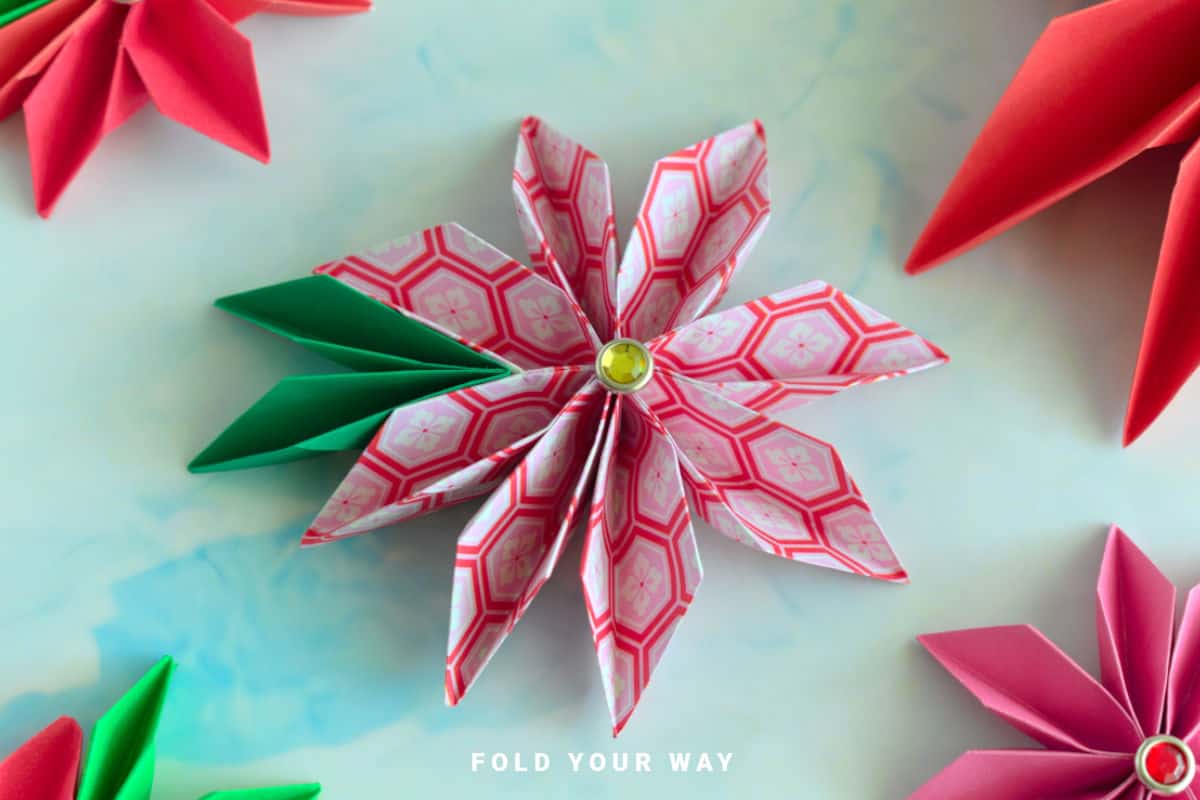
- Mix and match solid and patterned paper for unique holiday crafting.
- Create mini poinsettias for card accents or larger ones for wreath focal points.
- Combine multiple poinsettias with greenery to make a full floral garland or centerpiece.
FAQ
Yes, but origami paper folds more cleanly. Regular paper may be thicker or less flexible, making folding harder.
Absolutely! Attach a loop of string or ribbon before assembling the petals to hang it easily on a tree or garland.
Other Paper Crafts You Might Like To Try:
Helpful Tips and Common Mistakes For Paper Crafts
Paper crafting and origami can be hard sometimes. Which is why we've made this printable PDF just for you.
It outlines helpful tips so that you can successfully complete your craft, and some of the most common mistakes people come across.
You can download the helpful tips and common mistakes for paper crafts printable PDF here.
Stay Connected
Made this pattern? Let us know how it went in the comments below!
Pin this post - Pin now to take your paper crafting skills to the next level.
Share on Instagram or Facebook - Capture the beauty of your finished paper craft project and share it on Instagram or Facebook! Tag us @foldyourway so we can see your work!
Other Patterns You Might Like To Try:
Looking for other easy patterns like this? Try these:


Comments
No Comments